
Polskie ePłatności (PeP) - Developer Zone (1.0.0)
Download OpenAPI specification:Download
Integrating your website with Polskie ePłatności Online means taking one of two main ways that differ both in customers’ experience and implementation:
Secure Form is a ready-to-go solution. All you need to do is to redirect the customer to a payment form in a proper manner. The form itself is prepared and hosted on PeP’s secure domain – you just need to send an appropriate request.
API allows you to accept payments directly on your website – PeP stays invisible from the customer’s point of view. You can integrate with PHP, Python, Ruby or any other programming language. You’ll also be able to use some more advanced features.
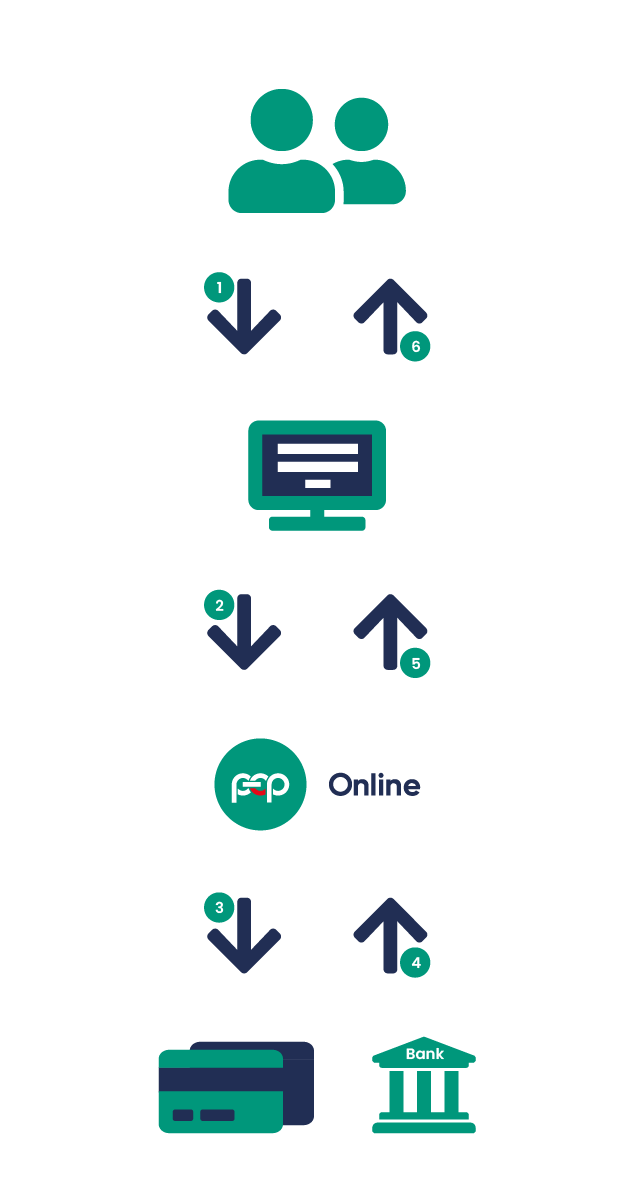
Below we present the general and simplified request flow for payment processing. This gives the idea of the whole process, but please check also such flows for API and Secure Form to learn about the most significant differences.

- A customer requests a checkout and initiates the payment.
- The merchant sends the collected information to PeP and requests a payment to be processed.
- Systems PeP Online communicate with appropriate institutions (depending on the payment method, e.g. banks, card associations, acquirers, issuers etc.) in order to process the payment.
- After processing the payment, its status is returned to PeP systems.
- Information about the payment is passed to the merchant’s website.
- The customer is informed about the transaction status.
If you happen to use (or planning to) any eCommerce platforms or shopping carts, our plugins and extensions to those systems should interest you. They allow to connect such eCommerce applications with PeP systems. We also have a few business model descriptions that you may find useful or inspiring for your business. Take a look, especially if you’re creating your own product/service/solution.
For those of you who use popular e-commerce platforms or shopping cart systems, we offer a number of plugins and integrations. Thanks to this, implementing payments on your website will take just a few minutes.
To download the latest plugin please contact support@pep.com

Magento
PeP extension is available at Magento Connect (the installation takes about 2 minutes).
Pobierz plugin do Magento 1 | Pobierz plugin do Magento 2

Prestashop
To install the PeP plugin for PrestaShop, extract the downloaded file to a proper directory and configure it in the admin section.

Wordpress
The PeP plugin for WordPress allows to place a payment button on a WordPress website.

WooComerce
The PeP WooCommerce plugin allows to accept payments in online stores built with WooCommerce.

WHMCS

Shopify

Shoplo
Shoplo is an e-commerce platform that offers a tool for creating online stores. Additionally, it allows to sell goods via Facebook, mobile and online auction websites like eBay or Allegro. PeP payments become active after entering the Merchat ID and hash salt values in the Shoplo administration panel.

Comarch eSklep

Shoper

Ebexo
Integracja PeP Online z platformą eCommerce Ebexo jest dostępna z panelu administracyjnego sklepu Ebexo.

KQS
To oprogramowanie eCommerce mające jednorazową opłatę bez dodatkowych zobowiązań licencyjnych. Integracja z PeP Online jest dostępna z poziomu panelu admina sklepu, po pobraniu i wprowadzeniu najnowszej aktualizacji sklepu w dziale 'Formy płatności'.

Clickshop

Get our free whitepaper on REST architecture. Learn:
- what is REST,
- why you should use it,
- how to use RESTful APIs, and more, including practical examples!
Click the button below to download the free whitepaper and share the news with your friends.
Secure Form is a ready-to-go solution that allows quick and easy integration with PeP systems. You only have to redirect your customers to the payment form we give you. There’s also no need for you to pass any PCI scans or have an SSL certificate (though having one is always recommended), since the actual payment is submitted via our secure payment form (hence the name). From the customer’s point of view, making a purchase looks like this:
- After choosing goods on the merchants website, a customer wishes to checkout and pay for selected products/services.
- The customer is redirected to PeP's Secure Form, where they enter all information needed to process the payment.
- After submitting the form, the customer is redirected back to the merchant’s website, where they learn about the payment/transaction status.
You just need to pass the needed transaction information (such as the product name, prices etc.) to our Secure Form using POST.
After submitting the payment, the customer is redirected back to your website along with some response messages.
It’s up to you whether the response will be sent using GET or POST.
You can use the said response to inform your customer whether the transaction was successful.

So, to sum up, the whole process can be described in the following steps:
- A customer, being on the merchants website, wishes to pay for the selected goods.
- The website sends transaction information to PeP’s payment form and redirects the customer there.
- After the form is filled and submitted, PeP processes the payment (sends the data to acquiring and issuing banks, card associations etc.) using the provided payment information.
- The said institutions (they may vary depending on the payment method) respond to PeP, allowing to finish processing the payment.
- PeP returns information about the payment status to the merchant’s website.
- The merchant can use the received information to inform his customer whether the transaction was successful and what its status is.
Secure Form is a ready-to-go payment form prepared by PeP. If you don’t want to integrate via our REST API, Secure Form is the choice for you.
You just have to redirect your customer to our page with the form, where they’ll perform a payment and will be redirected back to your website.
Simple redirect example:
The simplest case would involve an HTML form with specific information that would be sent via a POST request. There’s no need to require any the data from your customers, so all the fields will be hidden in most cases.
Here’s how it can look like:
<form action="https://secure.pep.pl/order/cart.html" method="post">
    <input type="hidden" name="amount" value="19.99">
    <input type="hidden" name="currency" value="EUR">
    <input type="hidden" name="merchant_id" value="john_test">
    <input type="hidden" name="description" value="TR001" />
    <input type="hidden" name="transaction_description" value="Product 1 transaction" />
    <input type="hidden" name="transaction_type" value="S">
    <input type="hidden" name="back_url" value="http://johns-shop.com/purchased">
    <input type="hidden" name="language" value="pl">
    <input type="hidden" name="hash" value="6926ed14d1ae4d8eb2350d3c15e6a420e3bb7052" />
    <button type="submit">Pay with PeP</button>
</form>
Simply log into the Merchant Panel, click account, Secure Form customization and Options.
You will find your merchant_id and hash salt there. That’s the data you will need to properly redirect your customers to PeP with a POST request.
The hash value is calculated using the following formula:
hash = SHA1(salt + "|" + description + "|" + amount + "|" + currency + "|" + transaction_type)
Example:
hash = SHA1("MySalt|TR001|19.99|EUR|S") = "6926ed14d1ae4d8eb2350d3c15e6a420e3bb7052"
You can set the salt value in the Merchant Panel.
**WARNING! You should never send salt or calculate the hash on the client’s side. This should always be done using a server-side script.
Below you can find the full list of parameters that may (or have to) be send with a Secure Form POST request.
Query structure
| POST field name | Format | Required | Description |
|---|---|---|---|
| merchant_id | string (32) | Yes | Your Merchant ID that gives you access to PeP’s Secure Form. You can find your Merchant ID in the Merchant Panel (account => secure form customization => options). |
| description | string(1-255) | Yes | Only letters and numbers are allowed. Transaction identifier that will be passed to PeP systems. This will be later visible as the transaction’s description in PeP’s Merchant Panel. |
| transaction_description | string(2-10000) | Yes | Basic HTML tags allowed. Description of the product/service/transaction. This description will appear on the payment form. |
| amount | decimal(12,2) | Yes | Use dot (.) as decimal separator. Total amount to be charged. |
| currency | string(3) | Yes | ISO 4217 currency code; the specified amount will be charged in this currency (for example “EUR” or “GBP”). |
| transaction_type | string(1) | Yes | Transaction type; there are three valid values: S – sale, A – authorization only, T - tokenization (card tokenization without collecting customer funds). In case of card payments, choose the preferred value; with other payment methods choose S. |
| back_url | string(500) | Yes | Website address where a customer will be redirected after performing the payment, for example http://myeshop.com/purchased. |
| hash | string(64) | Yes | Security hash. |
| hash_type | string(8) | No | SHA256 for transaction_type=T |
| language | string(2) | No | ISO 639 language code. Currently Secure Form can be presented in the following languages: en – English, pl – Polish, de – German, es – Spanish, fr – French, nl – Dutch, it – Italian, cz – Chech, fi – Finnish, dk – Dannish, no – Norwegian, sk – Slovak, se – Swedish. |
| payment_methods | string | No | List of available payment methods ids, separated by a comma. The list of payment methods can be found here. |
| customer_id | string(12) - only numeric characters | yes - for transaction_type=T | Customer ID in the merchant system. |
| customer_name | string(50) | No | Customer full name. |
| customer_email | string(80) | No | Customer email address. |
| **customer_address ** | string(46) | No | Customer address. |
| customer_zip | string(9) | No | Customer ZIP code (if applicable). |
| customer_city | string(40) | No | Customer city |
| customer_state | string(40) | No | Customer state/province (if applicable). |
| customer_country | string(2) | No | Customer country in ISO 3166 code, for example US or GB. |
When a customer pays (submits the Secure Form), they’re redirected back to your website (the URL specified in the back_url parameter).
A set of parameters is passed in response (using POST or GET – its your choice).
| POST field name | Format | Description |
|---|---|---|
| status | string | Sale status: PENDING – sale is waiting to be performed (in progress or not completed); PERFORMED – sale has been successfully performed; CLEARED – sale has been cleared (confirmation from a bank was received); ERROR – sale unsuccessful. |
| customer_id | string(12) | Customer_id parameter passed during tokenization when the transaction_type=T |
| description | string(20) | Transaction identifier – it is the same value you sent in the request. |
| amount | decimal(12,2) | Transaction amount. |
| currency | string(3) | Transaction currency code – ISO 4217 standard. For example USD, GBP, EUR. |
| hash | string(40) | Security hash. |
| id_authorization | integer(10) | Sale authorization ID number in PeP system. Empty, if: the transaction type was S (sale), T (tokenization) or request failed. |
| id_sale | integer(10) | Sale ID number in PeP system. Empty, if: the transaction type was A (authorization), T (tokenization) or request failed. |
| id_error | integer(10) | Error ID number in PeP system. Empty if no error occurred. |
| error_code | integer(3) | Numeric error code. |
| error_text | string(500) | Short error description. |
| fraud_score | decimal(4,2) | Fraud check result. 0.00 – low risk, 10.00 – high risk. Empty if fraud check was not performed. |
| avs_result | string(2) | Result of AVS check. Empty if AVS check was not performed. |
PeP uses the same salt value to generate another hash sent in response. It is calculated using the following formula:
hash = SHA1(salt + "|" + status + "|" + description + "|" + amount + "|" + currency + "|" + id)
The id value is either id_sale or id_authorization – depending on the response. If you receive an error, the id should be an empty string.
This way you only have to compare the received hash with the one calculated by you to learn whether the response was sent securely.
| ID | Payment method |
|---|---|
| 1 | Visa Card |
| 2 | MasterCard |
| 3 | Maestro UK Card |
| 4 | American Express Card |
| 5 | Direct Debit in Germany (ELV) |
| 6 | Direct Debit in the Netherlands (ENL) |
| 7 | Direct Debit in Austria (EEV) |
| 8 | Solo Card |
| 9 | Maestro International Card |
| 10 | Diners |
| 11 | Discover Card |
| 12 | JCB Card |
| 13 | Direct Debit in France |
| 14 | Direct Debit in United Kingdom |
| 15 | Direct Debit in Belgium |
| 16 | Direct Debit in Switzerland |
| 17 | Direct Debit in Italy |
| 18 | Direct Debit in Spain |
| 19 | Direct Debit in USA |
| 20 | Direct Debit in Canada |
| 21 | Direct Debit in Australia |
| 22 | Direct Debit in Irland |
| 23 | PayPal |
| 24 | Sofortbanking |
| 25 | Inteligo |
| 26 | iPko |
| 27 | mTransfer |
| 31 | Alior Bank |
| 32 | Alior Sync |
| 33 | Millenium |
| 35 | WBK |
| 36 | Credit Agricole |
| 37 | Other |
| 38 | Poczta Polska |
| 41 | Getin Bank |
| 42 | ING Bank Śląski |
| 44 | Giropay |
| 45 | Pekao SA |
| 46 | Ideal |
| 47 | SEPA Direct Debit |
| 48 | Bank Pocztowy |
| 50 | BNP Paribas |
| 52 | Blik |
| 53 | Apple Pay |
| 54 | Citi Handlowy |
| 55 | Plus Bank |
| 56 | Noble Pay |
| 57 | Bank Spółdzielczy |
| 58 | Nest Bank |
| 59 | Podkarpacki Bank Spółdzielczy |
| 60 | SGB |
| 61 | Google Pay |
| 62 | Toyota Bank |
| 63 | BOŚ Bank |
| 64 | Visa Mobile |
API is the best way to integrate with PeP if you want to have it completely your way. This also makes paying more comfortable to your customers, allowing them to reduce the whole purchase process even to a single click! You will have to meet some requirements (for example a SSL certificate), but you’ll also be able to create such payment solutions that will fit your needs and business character (see the business cases section for some examples). From the customer’s point of view, making a purchase looks like this:
- After choosing goods on the merchants website, a customer wishes to checkout and pay for selected products/services.
- The customer is shown a payment form on the merchant’s website.
- After submitting the form, the customer is shown the payment/transaction status.
Since there’s no redirecting to other domains and the whole payment takes place on the same website, you can easily adjust all the look & feel, loading (for example using AJAX, if you prefer), messages etc. Besides, you can also implement many other payment models. Depending on the payment methods you use and your e-business characteristics, these may be paying with a single click, recurring payments, refunds and many more.
It’s mostly up to you. You know what you want to achieve, we just offer you the tools and our help. Check out the API Guide to learn how to use specific features in different programming languages, including PHP, Python and Ruby. You can also explore the REST function reference to learn about the available methods and use the API to its full potential.
So, to sum up, the whole process looks like this:
- A customer, being on the merchants website, wishes to pay for the selected goods.
- The website sends transaction information to PeP via our API, while the customer remains on the merchant’s page.
- PeP processes the payment (sends the data to acquiring and issuing banks, card associations etc.).
- The said institutions (they may vary depending on the payment method) respond to PeP, allowing to process the payment.
- PeP returns information about the payment status to the merchant’s website.
- The merchant can use the received information to inform his customer whether the transaction was successful and what its status is.
PeP Online REST Client is an API wrapper. It’s simply a layer written in a specific programming language that allows calling our RESTful API methods. All code examples on this page are based on the PeP REST Client.
JavaScript | PHP | Ruby | Python | Android
If you choose our REST API instead of the Secure Form, you’ll probably want to accept payments on your own website and improve the purchasing experience. This means you may have to collect some information from customers and pass it to PeP along with a payment request.
Most of the information required to send a payment request doesn’t have to be collected from the customer – at least not every time. For example customer information (name, email, address) can be retrieved from your database – assuming that you allow customers to create accounts on your site (e-store, web-app).
Also data such as the sale information (amount, currency, description) can be generated or retrieved automatically; however, it is a good practice to display such info on the payment screen. This way the customer will be assured that they’re paying the correct amount.
Payment methods
Depending on the selected payment method you may have to collect some information from the customer during the payment process.
In the most common situation you will present an HTML form for the customer to fill. After the form is submitted, you just send a request to PeP systems.
Examples
In most cases cards will require providing card information and direct debits will require account information. Standard payment forms for these payment methods may look like this:
  <form action="#" id="payment-form" method="post">
      <label>Numer karty:</label>
      <input type="text" id="card_number" name="card[card_number]" size="19" />

      <label>Imię i nazwisko na karcie:</label>
      <input type="text" id="name_on_card" name="card[name_on_card]" size="50" />

      <label>Data ważności:</label>
      <input type="text" id="expiration_month" name="card[expiration_month]" size="2" />
      <input type="text" id="expiration_year" name="card[expiration_year]" size="4" />

      <label>CVV/CVC:</label>
      <input type="text" id="card_code" name="card[card_code]" size="4" />

      <button type="submit">Pay with PeP</button>
  </form>
Cards are among the most popular payment methods in the world. Customers can use many kinds of cards to pay online, including credit cards, debit cards and pre-paid cards.
Cards are a good choice for most markets; some markets are even dominated by this payment method.
Before you start calling any API methods regarding card operations, please make sure that you have properly initiated the PeP Rest Client. It’s very easy, simply include a proper file and provide your user name and password.
PHP
  include_once ('PePRestClient.php');
  $client = new PePRestClient('your_login', 'your_password');
Ruby
  require 'pep_client'
  client = PeP::Client.new('your_login', 'your_password')
Python
  from client import PePRestClient
  client = PePRestClient("your_login", "your_password")
Android
PePApi api = PePClientFactory.createClassicClient(context, "your_login", "your_password");
For further details on API integration (error codes, test card numbers etc.), please check the integration & testing section.
PeP REST.js API flow:
- HTML markup is presented to the browser
- The PeP.js client is initialized and awaits for the payment form to be submitted
- Once the form is submitted, the PeP.js client sends all the sensitive credit card information to PeP's servers. A temporary credit card token (a 64byte long hexadecimal string) is generated, which is then injected back into the merchant’s payment form as a hidden input.
- The usual form submission process is resumed, and the merchant’s servers receive the token along with the other information from the form (except for the sensitive card data).
- The merchant can dispatch a sale/authorization/checkCard/checkCard3DSecure request using the secret token (this must occur within 15minutes of the token generation, as the token is temporary).
Here’s the basic HTML markup for a typical payment form:
<form id="checkout-form" action="" type="">
    <!-- merchant's input elements, as many as required -->
    <input type="text" name="first-name" value="">
    <input type="text" name="last-name" value="">
    <input type="text" name="email" value="">
    <input type="text" name="address" value="">

    <!-- card related input elements: -->
    <input type="text" value="" data-paylane="cc-number">
    <input type="text" value="" data-paylane="cc-expiry-month">
    <input type="text" value="" data-paylane="cc-expiry-year">
    <input type="text" value="" data-paylane="cc-cvv">
    <input type="text" value="" data-paylane="cc-name-on-card">

    <input type="submit" value="submit">
</form>
While the actual markup of the form can be fully altered to the merchant’s needs, the following points are crucial:
- The card related input elements must have the appropriate data-paylane attributes.
- The card related input elements must not have any name attributes. This is a security measure which prevents sensitive information from reaching the merchant’s servers.
- The payment form must have a unique id attribute. This value will be referenced by the PeP.js client lib.
Next, initialize the PeP.js client:
  <script src="path/to/PeP.js"></script>
  <script>
      try
      {
          var client = new PePClient({
              publicApiKey : 'PUBLIC_API_KEY',
              paymentForm  : 'checkout-form',
          });
      }
      catch (e)
      {
          console.log(e); // exceptions are fatal
      }
  </script>
The only required values by the PeP.js client are the merchant’s public API key and a payment form selector.
- kthe API key must be the 40 character string key found in the PeP Merchant Panel (Menu => Account => Merchant account settings => API)
- the payment form selector can be one of the following:
- The ID attribute of your payment form
- A DOM node representing the form (one found by using document.forms[i], for example)
- A jQuery object, containing only the payment form
Optionally, the following values can also be passed to the PeP.js client (if they aren’t provided, the default values are used):
cardNumberInputName(default:cc-number) – an alternative data-paylane value used to reference the credit card number input elementcardExpiryMonthInputName(default:cc-expiry-month) – an alternative data-paylane value used to reference the credit card expiry month input elementcardExpiryYearInputName(default:cc-expiry-year) – an alternative data-paylane value used to reference the credit card expiry year input elementcardSecurityvarInputName(default:cc-cvv) – an alternative data-paylane value used to reference the credit card CVV/CVV2 input elementcardHolderInputName(default:cc-name-on-card) – an alternative data-paylane value used to reference the cardholder name input elementerrorTypeInputName(default:paylane_error_type) – an alternative input name for the error type input elementerrorCodeInputName(default:paylane_error_code) – an alternative input name for the error var input elementerrorDescriptionInputName(default:paylane_error_description) – an alternative input name for the error description input elementtokenInputId(default:paylane-token) – an alternative ID attribute for the token input elementtokenInputName(default:paylane_token) – an alternative name attribute for the token input elementerrorHandler(default: empty funkcja) – an error handler callback function, must take the following three arguments: type, code, descriptioncallbackHandler(default: empty funkcja) – an optional form submission callback handler. This callback will be called once the AJAX request containing the temporary token is completed. The token will appear in the form as a hidden input, and will also be passed to the callback function as the only argument. If no callback is specified, the form will simply be resubmitted using the standard form submit event.
  /**
  Custom token callback handler.

  @param {string} token Temporary credit card token
  @return {void}
  */
  callbackHandler: function(token){}
PeP.js może wywoływać wyjątki i błędy.
Errors triggered by the PeP.js client are divided into two: exceptions and errors.
Exceptions are only thrown during the client initialization, for example when the necessary form or input elements cannot be found, or you pass an empty public key. These exceptions must be caught and handled using a try/catch block, though typically they will not occur if your form is set up correctly.
Errors, on the other hand, are slightly more unexpected as they can be caused by things such as network outages, malformed input data (such as a bad token or credit card number) and so on. The PeP.js client presents two methods for handling these errors; using an error callback (passed to the client constructor as errorHandler) and as hidden input fields in the payment form (which can be handled server-side).
- Error handling: ```javascript /**
- Custom error handler which allows the merchant to
- handle errors raised by the PePClient class,
- such as connection errors or erroneous API responses.
- @param {int} type Error type from PePClient.errorTypes
- @param {int} [code] Error code from the API response
- @param {string} [description] Error description from the API response
- @return {void} */ function errorHandler(type, code, description) { console.log(type, code, description); } ```
- Hidden input fields: The following hidden input fields will be appended to the payment form (please remember that their names can be overwritten by passing the necessary error* keys to the client constructor):
paylane_error_type: type of the error; 1 if it’s a connection error, or 2 if it’s an error returned by the PeP REST.js APIpaylane_error_code: present only during API errors, this is the error code returned by the REST.js APIpaylane_error_description: present only during API errors, this is the error description returned by the REST.js API
Prepare all the data required to perform the transaction as follows. As you can see, in case of a card transaction there are three sets of information: sale, customer and card data.
Example code
PHP
  $card_params = array(
      'sale'     => array(
          'amount'      => 19.99,
          'currency'    => 'EUR',
          'description' => 'Product #1'
      ),
      'customer' => array(
          'name'    => 'John Doe',
          'email'   => 'john@doe.com',
          'ip'      => '127.0.0.1',
          'address' => array (
              'street_house' => '1600 Pennsylvania Avenue Northwest',
              'city'         => 'Washington',
              'state'        => 'DC',
              'zip'          => '500',
              'country_code' => 'US',
          ),
      ),
      'card' => array(
          'token' => '12a34b45c67d89e00f1aa2bb3cc4dd5ee6ff12a34b45c67d89e00f1aa2bb3cc4',
      ),
  );
Ruby
  card_params = {
      'sale' => {
          'amount'      => 19.99,
          'currency'    => 'EUR',
          'description' => 'Product #1',
      },
      'customer' => {
          'name'    => 'John Doe',
          'email'   => 'john@doe.com',
          'ip'      => '127.0.0.1',
          'address' => {
              'street_house' => '1600 Pennsylvania Avenue Northwest',
              'city'         => 'Washington',
              'state'        => 'DC',
              'zip'          => '500',
              'country_code' => 'US'
          }
      },
      'card' => {
          'token' => '12a34b45c67d89e00f1aa2bb3cc4dd5ee6ff12a34b45c67d89e00f1aa2bb3cc4'
      }
  }
Python
  card_params = {
    'sale' : {
      'amount'      : 19.99,
      'currency'    : 'EUR',
      'description' : 'Product #1'
    },
    'customer' : {
      'name'    : 'John Doe',
      'email'   : 'john@doe.com',
      'ip'      : '127.0.0.1',
      'address' : {
        'street_house' : '1600 Pennsylvania Avenue Northwest',
        'city'         : 'Washington',
        'state'        : 'DC',
        'zip'          : '500',
        'country_code' : 'US'
      }
    },
    'card' : {
      'token' : '12a34b45c67d89e00f1aa2bb3cc4dd5ee6ff12a34b45c67d89e00f1aa2bb3cc4'
    }
  }
Android
  Sale sale = new Sale(
      19.99,
      "EUR",
      "Product #1"
  );
  Card card = new Card(
      "4111111111111111",
      "03",
      "2017",
      "John Doe",
      "123"
  );
  Address address = new Address(
      "1600 Pennsylvania Avenue Northwest",
      "Washington",
      "DC",
      "500",
      "US"
  );
  Customer customer = new Customer(
      "John Doe",
      "john@doe.com",
      "127.0.0.1",
      address
  );
Now simply perform the transaction using the card_sale_by_token method.
You can check whether the transaction was performed successfully by calling the 'is_success' method.
Retrieving the transaction ID number (or error details, if anything goes wrong) is also very simple and can be done as presented below.
Example code
PHP
  try {
      $status = $client->cardSaleByToken($card_params);
  } catch (Exception $e) {
      // handle exceptions here
  }

  // checking transaction status example (optional):
  if ($client->isSuccess()) {
      echo "Success, id_sale: {$status['id_sale']} \n";
  } else {
      die("Error ID: {$status['error']['id_error']}, \n".
          "Error number: {$status['error']['error_number']}, \n".
          "Error description: {$status['error']['error_description']}");
  }
Ruby
  begin
      status = client.card_sale_by_token(card_params)
  rescue PeP::ClientError => e
      # handle exceptions here
  end

  # checking transaction status example (optional):
  if client.success?
      puts "Success, id_sale: #{status["id_sale"]}"
  else
      puts "Error ID: #{status["error"]["id_error"]}, \n"\
          "Error number: #{status["error"]["error_number"]}, \n"\
          "Error description: #{status["error"]["error_description"]}"
      exit
  end
Python
  try:
      status = client.card_sale_by_token(card_params)
  except Exception, e:
      # handle exceptions here

  # checking transaction status example (optional):
  if client.is_success():
      print 'Success, id_sale: %s' % status['id_sale']
  else:
      sys.exit('Error ID: ' + str(status["error"]["id_error"]) + '\n' \
              'Error number: ' + str(status["error"]["error_number"]) + '\n' \
              'Error description: ' + str(status["error"]["error_description"]))
Android
  api.cardSale(sale, customer, card, new Callback<CardSaleResult>() {

        @Override
        public void onFinish(CardSaleResult result) {
            // success
        }

        @HandleException
        public void onProtocolError(ProtocolException e) {
            // invoke if not success
            // e.getCode() - error code
            // e.getMessage() - error message
        }

        @Override
        public void onError(Exception e) {
            // connection error etc.
        }
You can find all the structures’ descriptions in the REST Function Reference manual.
You may wish not to charge a customer, but only to authorize their card. This is quite useful in various scenarios, for example:
- getting the card number when a customer signs up for a free trial (you can charge them later automatically),
- checking the credit card (for example whether online transactions are not blocked),
- confirming the card when a customer creates an account in your e-store.
Authorizing a card means blocking a specific amount for some time on the customer’s card. You can either block the whole amount (and capture the funds later) or you can block just $1 (or €1, or £1, or…) just to verify the card.
Start with preparing data required to perform the authorization. Note that the data comes in exactly the same format as when performing a regular transaction. You can choose whether to authorize for just one euro, dollar, pound (or any other currency), or for the whole amount (if you’re planning to capture the funds later).
Example code
PHP
  $card_params = array(
      'sale' => array(
          'amount'      => 1.00,
          'currency'    => 'EUR',
          'description' => 'Product #1'
      ),
      'customer' => array(
          'name'    => 'John Doe',
          'email'   => 'john@doe.com',
          'ip'      => '127.0.0.1',
          'address' => array (
              'street_house' => '1600 Pennsylvania Avenue Northwest',
              'city'          => 'Washington',
              'state'         => 'DC',
              'zip'           => '500',
              'country_code'  => 'US',
          ),
      ),
      'card' => array(
          'token' => '12a34b45c67d89e00f1aa2bb3cc4dd5ee6ff12a34b45c67d89e00f1aa2bb3cc4'
      ),
  );
Ruby
  card_params = {
      'sale' => {
          'amount'      => 19.99,
          'currency'    => 'EUR',
          'description' => 'Product #1',
      },
      'customer' => {
          'name'    => 'John Doe',
          'email'   => 'john@doe.com',
          'ip'      => '127.0.0.1',
          'address' => {
              'street_house' => '1600 Pennsylvania Avenue Northwest',
              'city'         => 'Washington',
              'state'        => 'DC',
              'zip'          => '500',
              'country_code' => 'US'
          }
      },
      'card' => {
          'token' => '12a34b45c67d89e00f1aa2bb3cc4dd5ee6ff12a34b45c67d89e00f1aa2bb3cc4'
      }
  }
Python
  card_params = {
    'sale' : {
      'amount'      : 19.99,
      'currency'    : 'EUR',
      'description' : 'Product #1'
    },
    'customer' : {
      'name'    : 'John Doe',
      'email'   : 'john@doe.com',
      'ip'      : '127.0.0.1',
      'address' : {
        'street_house' : '1600 Pennsylvania Avenue Northwest',
        'city'         : 'Washington',
        'state'        : 'DC',
        'zip'          : '500',
        'country_code' : 'US'
      }
    },
    'card' : {
      'token' : '12a34b45c67d89e00f1aa2bb3cc4dd5ee6ff12a34b45c67d89e00f1aa2bb3cc4'
    }
  }
Android
  Sale sale = new Sale(19.99, "EUR", "Product #1");
  Address address = new Address("1600 Pennsylvania Avenue Northwest", "Washington", "DC", "500", "US");
  Customer customer = new Customer("John Doe", "john@doe.com", "127.0.0.1", address);
  Card card = new Card("4111111111111111", "03", "2017", "John Doe", "123");
Having the data prepared, simply call the card_authorization_by_token method (just like you would do with the card_sale method).
You can also easily check whether the authorization was successful and retrieve the ID number (as presented below) – you can use it later to perform resales within the recurring payments.
Example code
PHP
  try {
      $status = $client->cardAuthorizationByToken($card_params);
  } catch (Exception $e) {
      // handle exceptions here
  }

  // checking authorization status example (optional):
  if ($client->isSuccess()) {
      echo "Success, id_authorization: {$status['id_authorization']} \n";
  } else {
      die("Error ID: {$status['error']['id_error']}, \n".
          "Error number: {$status['error']['error_number']}, \n".
          "Error description: {$status['error']['error_description']}");
  }
Ruby
  begin
      status = client.card_authorization_by_token(card_params)
  rescue PeP::ClientError => e
      # handle exceptions here
  end

  # checking authorization status example (optional):
  if client.success?
      puts "Success, id_authorization: #{status["id_authorization"]}"
  else
      puts "Error ID: #{status["error"]["id_error"]}, \n"\
          "Error number: #{status["error"]["error_number"]}, \n"\
          "Error description: #{status["error"]["error_description"]}"
      exit
  end
Python
  try:
      status = client.card_authorization_by_token(card_params)
  except Exception, e:
      # handle exceptions here

  # checking authorization status example (optional):
  if client.is_success():
      print 'Success, id_authorization: %s' % status['id_authorization']
  else:
      sys.exit('Error ID: ' + str(status["error"]["id_error"]) + '\n' \
              'Error number: ' + str(status["error"]["error_number"]) + '\n' \
              'Error description: ' + str(status["error"]["error_description"]))
Android
  api.cardAuthorization(sale, customer, card, new Callback<AuthorizationResult>() {

      @Override
      public void onFinish(AuthorizationResult result) {
          // success
      }

      @HandleException
      public void onProtocolError(ProtocolException e) {
          // invoke if not success
          // e.getCode() - error code
          // e.getMessage() - error message
      }

      @Override
      public void onError(Exception e) {
          // connection error etc.
      }
  });
Recurring payments are simply resales performed in specific time periods. You can perform them based on any conditions defined by your business model.
Resales do not require all the credit/debit card and customer information. That is why they have to use either a single transaction (usually the first transaction which initiated the whole recurring procedure) or a card authorization.
This means we can define two types of recurring payments:
Important: Your first sale/authorization should always check 3D – Secure. For recuring payment based on transaction use 3DSecure-authSale and for based on card authorization use 3DSecure-auth
Start with preparing the necessary information to perform a resale. In order to do that you must first retrieve the ID number of a previous transaction. This ID number identifies the transaction in PeP's systems. You can easily retrieve this number while performing the transaction, for example:
Example code
PHP
  $status = $client->cardSale($card_params);
  $id_first_sale = $status['id_sale'];
Ruby
  status = client.card_sale(card_params)
  id_first_sale = status['id_sale']
Python
  status = client.card_sale(card_params)
  id_first_sale = status['id_sale']
Android
  api.cardSale(sale, customer, card, new Callback<CardSaleResult>() {
      @Override
      public void onFinish(CardSaleResult result) {
          long idFirstSale = result.getIdSale();
      }
  });
See the Single transaction page for more details on performing a single sale.
Although you can refer to any previous transaction ID to perform a resale, we highly recommend to refer to the most recent transaction. This approach has several advantages, for example it allows to easily track the transaction flow.
Usually merchants store such ID numbers in their database. This way they do not have to store any sensitive data, yet they are still able to refer to a specific transaction.
Now, having retrieved the ID number (i.e. from your database), prepare the required information and call the resale_by_sale function.
You can also check whether the transaction was performed successfully by calling the is_success method.
Retrieving the transaction ID number (or error details, if anything goes wrong) is also very simple and can be done as follows.
Example code
PHP
  $resale_params = array(
      'id_sale'     => $id_first_sale,
      'amount'      => 99.99,
      'currency'    => 'EUR',
      'description' => 'Recurring billing product #1',
  );

  // perform the resale:
  try {
      $status = $client->resaleBySale($resale_params);
  } catch (Exception $e) {
      // handle exceptions here
  }

  // checking transaction status example (optional):
  if ($client->isSuccess()) {
      echo "Success, second id_sale: {$status['id_sale']} \n";
  } else {
      die("Error ID: {$status['error']['id_error']}, \n".
          "Error number: {$status['error']['error_number']}, \n".
          "Error description: {$status['error']['error_description']}");
  }
Ruby
  resale_params = {
      'id_sale'     => id_first_sale,
      'amount'      => 99.99,
      'currency'    => 'EUR',
      'description' => 'Recurring billing product #1'
  }

  # perform the resale:
  begin
      status = client.resale_by_sale(resale_params)
  rescue PeP::ClientError => e
      # handle exceptions here
  end

  # checking transaction status example (optional):
  if client.success?
      puts "Success, id_second_sale: #{status["id_sale"]}"
  else
      puts "Error ID: #{status["error"]["id_error"]}, \n"\
          "Error number: #{status["error"]["error_number"]}, \n"\
          "Error description: #{status["error"]["error_description"]}"
      exit
  end
Python
  resale_params = {
    'id_sale'     : id_first_sale,
    'amount'      : 99.99,
    'currency'    : 'EUR',
    'description' : 'Recurring billing product #1'
  }

  # perform the resale:
  try:
      status = client.resale_by_sale(resale_params)
  except Exception, e:
      # handle exceptions here

  # checking transaction status example (optional):
  if client.is_success():
      print 'Success, second id_sale: %s' % status['id_sale']
  else:
      sys.exit('Error ID: ' + str(status["error"]["id_error"]) + '\n' \
              'Error number: ' + str(status["error"]["error_number"]) + '\n' \
              'Error description: ' + str(status["error"]["error_description"]))
Android
  api.resaleSale(
      idFirstSale,
      99.99,
      "EUR",
      "Recurring billing product #1",
      new Callback<FraudSaleResult>() {
          @Override
          public void onFinish(FraudSaleResult result) {
              // success
          }

          @HandleException
          public void onProtocolError(ProtocolException e) {
              // invoke if not success
              // e.getCode() - error code
              // e.getMessage() - error message
          }

          @Override
          public void onError(Exception e) {
              // connection error etc.
          }
      }
  );
Recurring payments are just resales performed periodically. It’s your choice whether you want to do this weekly, monthly or annually; it is also possible to perform a resale e.g. when a customer reaches a certain amount that should be paid.
There are cases when you want to return customer’s money – either the whole amount or just a part of it. This is exactly what a refund is for – it allows you to return funds in reference to a specific transaction.
In order to perform a refund, you must know the transaction ID number. This ID number identifies the transaction in PeP's systems. You can easily retrieve this number while performing the transaction, for example:
Example code
PHP
  $status = $client->cardSale($card_params);
  $id_sale = $status['id_sale'];
Ruby
  status = client.card_sale(card_params)
  id_sale = status['id_sale']
Python
  status = client.card_sale(card_params)
  id_sale = status['id_sale']
Android
  api.cardSale(sale, customer, card, new Callback<CardSaleResult>() {
      @Override
      public void onFinish(CardSaleResult result) {
          long idFirstSale = result.getIdSale();
      }
  });
See the Single transaction page for more details on performing a single sale.
Usually merchants store such ID numbers in their database. This way they do not have to store any sensitive data, yet they are still able to refer to a specific transaction.
Now prepare the required data and perform the refund. Note that you can provide the amount of the transaction or less; if you enter a greater value than the transaction amount, you will receive an error message. You can also specify the refund’s reason and currency.
Just like with any other transaction, you can also check whether the refund was performed successfully by calling the is_success method.
Retrieving the refund ID number (or error details, if anything goes wrong) is also very simple and can be done as presented below.
Example code
PHP
  $refund_params = array(
      'id_sale' => $id_sale,
      'amount'  => 9.99,
      'reason'  => 'Partial refund',
  );

  // perform the refund:
  try {
      $status = $client->refund($refund_params);
  } catch (Exception $e) {
      // handle exceptions here
  }

  // checking refund status example (optional):
  if ($client->isSuccess()) {
      echo "Success, id_refund: {$status['id_refund']} \n";
  } else {
      die("Error ID: {$status['error']['id_error']}, \n".
          "Error number: {$status['error']['error_number']}, \n".
          "Error description: {$status['error']['error_description']}");
  }
Ruby
  refund_params = {
      'id_sale' => id_sale,
      'amount'  => 9.99,
      'reason'  => 'Partial refund.'
  }

  # perform the refund:
  begin
      status = client.refund(refund_params)
  rescue PeP::ClientError => e
      # handle exceptions here
  end

  # checking refund status example (optional):
  if client.success?
      puts "Success, id_refund: #{status["id_refund"]}"
  else
      puts "Error ID: #{status["error"]["id_error"]}, \n"\
          "Error number: #{status["error"]["error_number"]}, \n"\
          "Error description: #{status["error"]["error_description"]}"
      exit
  end
Python
  refund_params = {
    'id_sale' : id_sale,
    'amount'  : 9.99,
    'reason'  : 'Partial refund'
  }

  # perform the refund:
  try:
      status = client.refund(refund_params)
  except Exception, e:
      # handle exceptions here

  # checking refund status example (optional):
  if client.is_success():
      print 'Success, id_refund: %s' % status['id_refund']
  else:
      sys.exit('Error ID: ' + str(status["error"]["id_error"]) + '\n' \
              'Error number: ' + str(status["error"]["error_number"]) + '\n' \
              'Error description: ' + str(status["error"]["error_description"]))
Android
  api.refund(idSale, 9.99, "EUR", "Partial refund", new Callback<FraudSaleResult>() {

      @Override
      public void onFinish(FraudSaleResult result) {
          // success
      }

      @HandleException
      public void onProtocolError(ProtocolException e) {
          // invoke if not success
          // e.getCode() - error code
          // e.getMessage() - error message
      }

      @Override
      public void onError(Exception e) {
          // connection error etc.
      }
  });
Prepare all the data required to perform the transaction as follows. As you can see, in case of a card transaction there are three sets of information: sale, customer and card data.
Example code
PHP
  $card_params = array(
      'sale' => array(
          'amount'      => 100.00,
          'currency'    => 'EUR',
          'description' => 'Product #1'
      ),
      'customer' => array(
          'name'    => 'John Doe',
          'email'   => 'john@doe.com',
          'ip'      => '127.0.0.1',
          'address' => array (
              'street_house' => '1600 Pennsylvania Avenue Northwest',
              'city'         => 'Washington',
              'state'        => 'DC',
              'zip'          => '500',
              'country_code' => 'US',
          ),
      ),
      'card' => array(
          'token' => '12a34b45c67d89e00f1aa2bb3cc4dd5ee6ff12a34b45c67d89e00f1aa2bb3cc4'
      ),
      'back_url' => 'http://example.com/3dsecure', // 3d secure back redirect url
  );
Ruby
  card_params = {
      'sale' => {
          'amount'      => 19.99,
          'currency'    => 'EUR',
          'description' => 'Product #1',
      },
      'customer' => {
          'name'    => 'John Doe',
          'email'   => 'john@doe.com',
          'ip'      => '127.0.0.1',
          'address' => {
              'street_house' => '1600 Pennsylvania Avenue Northwest',
              'city'         => 'Washington',
              'state'        => 'DC',
              'zip'          => '500',
              'country_code' => 'US'
          }
      },
      'card' => {
          'token' => '12a34b45c67d89e00f1aa2bb3cc4dd5ee6ff12a34b45c67d89e00f1aa2bb3cc4'
      },
      'back_url' => 'http://example-url.com'
  }
Python
  card_params = {
    'sale' : {
      'amount'      : 19.99,
      'currency'    : 'EUR',
      'description' : 'Product #1'
    },
    'customer' : {
      'name'    : 'John Doe',
      'email'   : 'john@doe.com',
      'ip'      : '127.0.0.1',
      'address' : {
        'street_house' : '1600 Pennsylvania Avenue Northwest',
        'city'         : 'Washington',
        'state'        : 'DC',
        'zip'          : '500',
        'country_code' : 'US'
      }
    },
    'card' : {
      'token' : '12a34b45c67d89e00f1aa2bb3cc4dd5ee6ff12a34b45c67d89e00f1aa2bb3cc4'
    },
    'back_url' : 'http://example.com/3dsecure'
  }
Android
  Sale sale = new Sale(19.99, "EUR", "Product #1");
  Address address = new Address("1600 Pennsylvania Avenue Northwest", "Washington", "DC", "500", "US");
  Customer customer = new Customer("John Doe", "john@doe.com", "127.0.0.1", address);
  Card card = new Card("4111111111111111", "03", "2017", "John Doe", "123")
To check whether a card is enrolled in the 3-D Secure program, simply call the check_card_3d_secure_by_token method.
If the card is enrolled, you will also get an id_3dsecure_auth number.
Example code
PHP
  try {
      $status = $client->checkCard3DSecureByToken($card_params);
  }
  catch (Exception $e) {
      // Handle exception here, for example show an error page, stop action
  }

  if ($client->isSuccess()) {
      echo "Success, id_3dsecure_auth: {$status['id_3dsecure_auth']} \n";
  } else {
      echo "Error ID: {$status['error']['id_error']}, \n".
          "Error number: {$status['error']['error_number']}, \n".
          "Error description: {$status['error']['error_description']}";
  }

  if (true == $status['is_card_enrolled'])
  {
      // redirect to 3-D Secure provider
      header('Location: ' . $status['redirect_url']);
      die;
  }
Ruby
  begin
      status = client.check_card_3d_secure_by_token(card_params)
  rescue PeP::ClientError => e
      # handle exceptions here
  end

  if client.success?
      puts "Success, id_3dsecure_auth: #{status["id_3dsecure_auth"]}"
  else
      puts "Error ID: #{status["error"]["id_error"]}, \n"\
          "Error number: #{status["error"]["error_number"]}, \n"\
          "Error description: #{status["error"]["error_description"]}"
  end

  if status['is_card_enrolled']
      # redirect to url in status['redirect_url']
      exit
  end
Python
  try:
      status = client.check_card_3d_secure_by_token(card_params)
  except Exception, e:
      # handle exceptions here

  if client.is_success():
      print 'Success, id_3dsecure_auth: %s' % status['id_3dsecure_auth']
  else:
      print 'Error (%s), %s - %s' % (status['error'].get('id_error'),
                                    status['error'].get('error_number'),
                                    status['error'].get('error_description'))

  if status['is_card_enrolled']:
      # redirect to url in status['redirect_url']
      sys.exit()
Android
  api.secure3DCheckCard(sale, customer, card, "http:// example.com/3dsecure", new Callback<Secure3DSaleResult>() {

  @Override
  public void onFinish(Secure3DSaleResult result) {

      if (result.isEnrolled()) {
          WebView webview =...;
          webview.loadUrl(result.getRedirectUrl());
      }
  }

      @HandleException
      public void onProtocolError(ProtocolException e) {
          // invoke if not success
          // e.getCode() - error code
          // e.getMessage() - error message
      }

      @Override
      public void onError(Exception e) {
          // connection error etc.
      }
  });
If the 3-D Secure request was performed successfully, you may now proceed with the actual transaction and redirect the customer to the 3-D Secure provider’s website (use the received redirect_url).
If the transaction was rejected and you received an error, process with a regular single card payment. You should also save the received error information in your system.
After providing the required information, the customer will be redirected back to your website (back_url).
You should now verify the returned information to avoid any fraud attempts and check the transaction’s status.
Example code
PHP
  $salt        = 'YOUR_HASH_SALT';
  $status      = $_GET['status'];
  $description = $_GET['description'];
  $amount      = $_GET['amount'];
  $currency    = $_GET['currency'];
  $hash        = $_GET['hash'];

  $id = '';
  if ($status !== 'ERROR') // success, get id_3dsecure_auth
      $id = $_GET['id_3dsecure_auth'];

  $calc_hash = sha1("{$salt}|{$status}|{$description}|{$amount}|{$currency}|{$id}");

  // check hash salt
  if ( $calc_hash !== $hash ) {
      die ("Error, wrong hash");
  }

  // check transaction status
  if ($status === 'ERROR') {
      die("Error, 3-D auth transaction declined");
  } else {
      // 3-D Secure authorization completed, perform sale
  }
Ruby
  # Simple controller action code in Rails
  # it's just an example - most of the logic should be moved to model

  salt        = 'YOUR_HASH_SALT'
  status      = params['status']
  description = params['description']
  amount      = params['amount']
  currency    = params['currency']
  hash        = params['hash']

  id = ''
  unless status == 'ERROR'
      id = params['id_3dsecure_auth']
  else
  # redirect to an index action to correct the payment + simple notice
  # for Rails: redirect_to :index, :notice => "Error, 3-D auth transaction declined"
  end

  calc_hash = Digest::SHA1.hexdigest("#{salt}|#{status}|#{description}|#{amount}|#{currency}|#{id}")

  unless calc_hash == hash
  # redirect to an index action to correct the payment
  # for Rails: redirect_to :index, :notice => "Wrong hash"
  end


  # check transaction status

  if status == 'ERROR'
  # redirect to an index action to correct the payment + simple notice
  # for Rails: redirect_to :index, :notice => "Error, 3-D auth transaction declined"
  else
  # 3-D Secure authorization completed, perform sale
  end
Python
  salt             = 'YOUR_HASH_SALT'
  status           = get_request_param('status')
  description      = get_request_param('description')
  amount           = get_request_param('amount')
  currency         = get_request_param('currency')
  hash             = get_request_param('hash')
  id_3dsecure_auth = None

  # success, get id_3dsecure_auth
  if status != 'ERROR':
      id_3dsecure_auth = get_request_param('id_3dsecure_auth')

  calc_hash = hashlib.sha1(
      '|'.join([salt, status, description, amount, currency, id_3dsecure_auth])).hexdigest()

  # check hash salt
  if calc_hash != hash:
      sys.exit('Error, wrong hash')

  # check transaction status
  if status == 'ERROR':
      sys.exit('Error, 3-D auth transaction declined')
  else:
      # '3-D Secure authorization completed, perform sale'
Android
  webview.setWebViewClient(new WebViewClient() {
      @Override
      public boolean shouldOverrideUrlLoading(WebView view, String url) {

          if (url.contains(redirectUrl)) {
              try {
                  Map<String, String> map = getQueryMap(new URL(url).getQuery());
                  String salt = "YOUR_HASH_SALT";
                  String status = map.get("status");
                  String description = map.get("description");
                  String amount = map.get("amount");
                  String currency = map.get("currency");
                  String hash = map.get("hash");
                  String id = map.get("id_3dsecure_auth");

                  String calcHash = sha1(String.format("%1$s|%2$s|%3$s|%4$s|%5$s|%6$s", salt, status, description, amount, currency, id));

                  //  check hash salt
                  if (!calcHash.equals(hash)) {
                      // Error, wrong hash
                  }

                  if (status.equals("ERROR")) {
                      String errorDescription=map.get("error_description");
                      // Error, transaction declined

                  } else {
                      String idSale=map.get("id_sale");
                      // Success, transaction completed
                  }

              } catch (MalformedURLException e) {
                  e.printStackTrace();
              } catch (NoSuchAlgorithmException e) {
                  e.printStackTrace();
              } catch (UnsupportedEncodingException e) {
                  e.printStackTrace();
              }
          } else {
              view.loadUrl(url);
          }
          return true;
      }
  });

  public static Map<String, String> getQueryMap(String query) {
      String[] params = query.split("&");
      Map<String, String> map = new HashMap<String, String>();
      for (String param : params) {
          String name = param.split("=")[0];
          String value = param.split("=")[1];
          map.put(name, value);
      }
      return map;
  }

  private static String convertToHex(byte[] data) {
      StringBuilder buf = new StringBuilder();
      for (byte b : data) {
          int halfbyte = (b >>> 4) & 0x0F;
          int two_halfs = 0;
          do {
              buf.append((0 <= halfbyte) && (halfbyte <= 9) ? (char) ('0' + halfbyte) : (char) ('a' + (halfbyte - 10)));
              halfbyte = b & 0x0F;
          } while (two_halfs++ < 1);
      }
      return buf.toString();
  }

  public static String sha1(String text) throws NoSuchAlgorithmException, UnsupportedEncodingException {
      MessageDigest md = MessageDigest.getInstance("SHA-1");
      md.update(text.getBytes("utf-8"), 0, text.length());
      byte[] sha1hash = md.digest();
      return convertToHex(sha1hash);
  }
If everything went fine, you may now perform the actual payment based on the 3-D Secure authorization.
You can check whether the transaction was performed successfully by calling the is_success method.
Retrieving the transaction ID number (or error details, if anything goes wrong) is also very simple and can be done as shown below.
Example code
PHP
  try {
      $status = $client->saleBy3DSecureAuthorization(array ('id_3dsecure_auth' => $id));
  } catch (Exception $e) {
      // Handle exception here, for example show an error page, stop action
  }

  if ($client->isSuccess())
  {
      echo "Success, id_sale: {$status['id_sale']} \n";
  } else {
      echo "Error ID: {$status['error']['id_error']}, \n".
          "Error number: {$status['error']['error_number']}, \n".
          "Error description: {$status['error']['error_description']}");
  }
Ruby
  begin
      status = client.sale_by_3d_secure_authorization({"id_3dsecure_auth" => id})
  rescue PeP::ClientError => e
      # handle exceptions here
  end

  if client.success?
      puts "Success, id_sale: #{status["id_sale"]}"
  else
      puts "Error ID: #{status["error"]["id_error"]}, \n"\
          "Error number: #{status["error"]["error_number"]}, \n"\
          "Error description: #{status["error"]["error_description"]}"
  end
Python
  try:
      status = client.sale_by_3d_secure_authorization(
          {'id_3dsecure_auth': id_3dsecure_auth})
  except Exception, e:
      # handle exceptions here

  if client.is_success():
      print 'Success, id_sale: %s' % status['id_sale']
  else:
      print 'Error (%s), %s - %s' % (status['error'].get('id_error'),
                                    status['error'].get('error_number'),
                                    status['error'].get('error_description'))
Android
  Secure3DSaleResult result =...;
  long id3dSecureAuth = result.getId3dSecureAuth();
  api.secure3DAuthSale(id3dSecureAuth, new Callback<CardSaleResult>() {

      @Override
      public void onFinish(CardSaleResult result) {
          // success
      }
  });
The situation presented above is an ideal flow. But it may happen that a card is not enrolled in the 3-D Secure program. Here’s how to deal with that.
After the 3-D authorization was performed, make sure that the card is enrolled and simply call the sale_by_3d_secure_authorization method like you would normally. It is important that you do this (instead of performing a regular sale) for security reasons – this way the whole 3-D Secure attempt will be recorded.
You can check whether the transaction was performed successfully by calling the is_success method.
Retrieving the transaction ID number (or error details, if anything goes wrong) is also very simple and can be done as shown below.
Example code
PHP
  $id_3dsecure_auth = $status['id_3dsecure_auth'];

  if (true != $status['is_card_enrolled'])
  {
      try {
          $status = $client->saleBy3DSecureAuthorization(array ('id_3dsecure_auth' => $id_3dsecure_auth));
      } catch (Exception $e) {
          // Handle exception here, for example show an error page, stop action
      }
  }

  if ($client->isSuccess()) {
      echo "Success, id_sale: {$status['id_sale']} \n";
  } else {
      echo "Error ID: {$status['error']['id_error']}, \n".
          "Error number: {$status['error']['error_number']}, \n".
          "Error description: {$status['error']['error_description']}");
  }
Ruby
  id_3dsecure_auth = status['id_3dsecure_auth']

  unless status['is_card_enrolled']
      begin
          status = client.sale_by_3d_secure_authorization({"id_3dsecure_auth" => id_3dsecure_auth})
      rescue PeP::ClientError => e
          # Handle exception here, for example show an error page, stop action
      end
  end

  if client.success?
      puts "Success, id_sale: #{status["id_sale"]}"
  else
      puts "Error ID: #{status["error"]["id_error"]}, \n"\
          "Error number: #{status["error"]["error_number"]}, \n"\
          "Error description: #{status["error"]["error_description"]}"
  end
Python
  if not is_card_enrolled:
      try:
          status = client.sale_by_3d_secure_authorization(
              {'id_3dsecure_auth': id_3dsecure_auth})
      except Exception, e:
          # Handle exception here, for example show an error page, stop action

  if client.is_success():
      print 'Success, id_sale: %s' % status['id_sale']
  else:
      print 'Error (%s), %s - %s' % (status['error'].get('id_error'),
                                    status['error'].get('error_number'),
                                    status['error'].get('error_description'))
Android
  Secure3DSaleResult result =...;
  if (!result.isEnrolled()) {
      api.secure3DAuthSale(result.getId3dSecureAuth(), new Callback<CardSaleResult>() {

          @Override
          public void onFinish(CardSaleResult result) {
              // success
          }
      });
  }
Google Pay™ lets your customers pay with the press of a button — using payment methods saved to their Google Account.
Customer payment data is end-to-end encrypted from Google’s servers to your payment processor.
Google Pay works with your existing payments processing stack and can be implemented with a few lines of code.
Please review following documentations before continuing:
Create production account Google Pay:
Load required libraries:
  "https://pay.google.com/gp/p/js/pay.js"
  "https://js.pep.pl/v1"
  // set up PeP JS client
  PeP.setPublicApiKey('MY_PUBLIC_API_KEY');

  // set up Google Pay with production Account
  PeP.googlePay.init({
  environment: 'PRODUCTION',
  googleMerchantId: 'ID UZYSKAZANE PO ZAŁOŻENIU KONTA PRODUKCYJNEGO W GOOGLE'
  });

  // prepare basic transaction data
  const TRANSACTION = {
    currencyCode: "USD",
    totalPrice: "1.00"
  };

  // check whether Google pay is available
  PeP.googlePay
    .isReadyToPay()
    .then(function(response) {
      if (response.result) {
        // proceed
        showGooglePayBtn();
      } else {
        console.warn("Google Pay is not available");
      }
    })
    .catch(function(err) {
      // handle errors here
      console.error(err);
    });

  const showGooglePayBtn = function() {
    // create Google Pay button
    const button = PeP.googlePay.createButton({
      onClick: onGooglePaymentButtonClicked
    });

    // append button
    document.getElementById('container').appendChild(button);
  };

  const onGooglePaymentButtonClicked = function() {
    PeP.googlePay
      .loadPayment(TRANSACTION)
      .then(function(paymentData) {
        // extract and encode payment token
        const token = btoa(paymentData.paymentMethodData.tokenizationData.token);

        // pass required transaction data along with the `token` to your backend
        // application and perform transaction
      })
      .catch(function(err) {
        // handle errors here
        console.error(err);
      });
  };
Before you start calling any API methods regarding card operations, please make sure that you have properly initiated the PeP Rest Client. It’s very easy, simply include a proper file and provide your user name and password.
PHP
  include_once ('PePRestClient.php');
  $client = new PePRestClient('your_API_login', 'your_API_password');
For further details on API integration (error codes, test card numbers etc.), please check the integration & testing section.
Prepare all the data required to perform the transaction as follows. As you can see, in case of a Google Pay transaction there are three sets of information: sale, customer and card data.
Sample Request
  {
      "sale": {
          "amount": 1.00,
          "currency": "USD",
          "description": "TR001"
      },
      "customer": {
          "name": "John Doe",
          "email": "john.doe@example.com",
          "country_code": "US",
          "ip": "127.0.0.1"
      },
      "card": {
          "token": "eyJzaWduYXR1cmUiOiJNRVlDSVFDcUE1T0Vpd1ptR29GNlVqUEI3MktBNWtOa2lyUE5WMGN0T1A4Uytwam1qd0loQUo1QjVXa3Vnd1JhNWk3enRUWjE4eHBEWjJXK0hNTjh3a0M2SFFCZ3ZyUWkiLCJwcm90b2NvbFZlcnNpb24iOiJFQ3YxIiwic2lnbmVkTWVzc2FnZSI6IntcImVuY3J5cHRlZE1lc3NhZ2VcIjpcIlJnSGV1UVA4OVFpa1FDZmtLemRia1g3dU4wUE8zSmFDcE5hRHRhQ1ZkQ0ErZFkvL0VyRzZvQ1NZZ3Yyc3dONkdaRmZwd09zL1ZiVTNjcVFLRC81YXRNQVV5STNidnZpOGRxcXlOb0J4aTVkUi9tbS9OZmRJdHpSdEE3YXovSndMTEpreGNOMzRLZHNQV3VhVHhRZ2MyWFBCUkN2TVpLeUQ1VWNuY1U4cktKSEhnSWlNZEMwUnhNU0Uxc1RVWEwxVDk0eURJck9jdlNlcmRYdnpLZGhUOUQxcUl0azA2VW5uc2dhRHFWdGg0SHMyY1hTUFVJYlNIc25ydlRsZGg2dGlkOTF2WWZRYldYeElqQUF1ZFRQME8xR25oTnJjYXo5WjBxeUVWUEVQQnVzc29kWU1pL1JQa3VNREh6TU1sUUV2Mms3SXBtdDZJZGVnd0t5L21VYlFNeld1NDdzc2Jmb2xWbW1vOGRrTlJhYmo5Z0dtQWwrL1ErelY1MUNPeG5CSWhBUHU2NUMwZ3RuTi8yZWJMNnZNdWQxbE5xRXV0WVd4alpGRWY4Q2ZkZ3lQM3M5WXdYWXdoenRTTi9ycGhCV1hpWmNOT29Ea2xxWWEvSVphT2o0TnVnNVdLU3hka2pVazhmSTJiNlV2ZEIwbHMrakpuenZRdStzUndlWHZoNmRRa2JuazhGS3VKeVdkZGl2c3NJcjlJZW1Jc3JFOUE5T3FlSnpWOVRjSThRb01ZWmNiQUZkcUlBRjhWTUJLSjMwU28yYyt4SnU5b21FUy9QbFVXU1hJdXltL1hXMldhd1xcdTAwM2RcXHUwMDNkXCIsXCJlcGhlbWVyYWxQdWJsaWNLZXlcIjpcIkJGZzZoNWZkQ0RIbWFNODlNN0VKOVdyWHVkZWh3bzFrci8rWmdNZDJiUE5NNmhHVVZRZVp2VHRZSm5ua1dGY2JVODZteXU0WmduM2VyL05pMUNwVFk1RVxcdTAwM2RcIixcInRhZ1wiOlwiY3NzcXNmcnJpSDRwSzlUQmJPRWpSMDc2Slc2YWNKL3JEQ3JHTUpaLzFaa1xcdTAwM2RcIn0ifQ=="
      }
      "back_url"  :   "http://example-url.com"
  }
Now simply perform the transaction using the googlePaySale or googlePayAuthorization method.
Retrieving the transaction ID number (or error details, if anything goes wrong) is also very simple and can be done as presented below.
PHP
  try {
      $status = $client->googlePaySale($google_pay_params);
  } catch (Exception $e) {
      // handle exceptions here
  }

  // checking transaction status example (optional):
  if ($client->isSuccess()) {
      echo "Success, id_sale: {$status['id_sale']} \n";
  } else {
      die("Error ID: {$status['error']['id_error']}, \n".
          "Error number: {$status['error']['error_number']}, \n".
          "Error description: {$status['error']['error_description']}");
  }
Ruby
  begin
      status = client.google_pay_sale(google_pay_params)
  rescue PeP::ClientError => e
      # handle exceptions here
  end

  # checking transaction status example (optional):
  if client.success?
      puts "Success, id_sale: #{status["id_sale"]}"
  else
      puts "Error ID: #{status["error"]["id_error"]}, \n"\
          "Error number: #{status["error"]["error_number"]}, \n"\
          "Error description: #{status["error"]["error_description"]}"
      exit
  end
Python
  try:
      status = client.google_pay_sale(google_pay_params)
  except Exception, e:
      # handle exceptions here

  # checking transaction status example (optional):
  if client.is_success():
      print 'Success, id_sale: %s' % status['id_sale']
  else:
      sys.exit('Error ID: ' + str(status["error"]["id_error"]) + '\n' \
              'Error number: ' + str(status["error"]["error_number"]) + '\n' \
              'Error description: ' + str(status["error"]["error_description"]))
You can find all the structures’ descriptions in the REST Function Reference manual.
Bank transfers are one of the most common payment methods (along with credit cards). What is more, customers in some countries highly prefer this way of paying for goods purchased online – whole payment systems or mechanisms based on bank transfers emerge from such local trends.
Before using the API and calling any methods regarding bank transfers, remember to ensure that the PeP Rest Client was initiated. Remember to provide the correct user name and password.
Example code
PHP
  include_once ('PePRestClient.php');
  $client = new PePRestClient('your_login', 'your_password');
Ruby
  require 'pep_client'
  client = PeP::Client.new('your_login', 'your_password')
Python
  from client import PePRestClient
  client = PePRestClient("your_login", "your_password")
Android
PePApi api = PePClientFactory.createClassicClient(context, "your_login", "your_password");
Start with preparing information required to perform a bank transfer. Provide sale and customer data, specify the payment type to choose a bank and define a back url – customers will be redirected to this website after submitting the payment.
Example code
PHP
  $bt_params = array(
      'sale' => array(
          'amount'      => 19.99,
          'currency'    => 'PLN',
          'description' => 'Product #1'
      ),
      'customer' => array(
          'name'    => 'John Doe',
          'email'   => 'john@doe.com',
          'ip'      => '127.0.0.1',
          'address' => array (
              'street_house' => '1600 Pennsylvania Avenue Northwest',
              'city'         => 'Washington',
              'state'        => 'DC',
              'zip'          => '500',
              'country_code' => 'US',
          ),
      ),
      'payment_type' => 'MT',
      'back_url'     => 'http://example-page.com',
  );
Ruby
  bt_params = {
      'sale' =>   {
          'amount'      => 19.99,
          'currency'    => 'PLN',
          'description' => 'Product #1'
      },
      'customer' =>   {
          'name'    => 'John Doe',
          'email'   => 'john@doe.com',
          'ip'      => '127.0.0.1',
          'address' => {
              'street_house' => '1600 Pennsylvania Avenue Northwest',
              'city'         => 'Washington',
              'state'        => 'DC',
              'zip'          => '500',
              'country_code' => 'US'
          },
      },
      'payment_type' => 'MT',
      'back_url'     => 'http://example-page.com'
  }
Python
  bt_params = {
    'sale' : {
      'amount'      : 19.99,
      'currency'    : 'PLN',
      'description' : 'Product #1'
    },
    'customer' : {
      'name'    : 'John Doe'
      'email'   : 'john@doe.com',
      'ip'      : '127.0.0.1',
      'address' : {
        'street_house' : '1600 Pennsylvania Avenue Northwest',
        'city'         : 'Washington',
        'state'        : 'DC',
        'zip'          : '500'
        'country_code' : 'US'
      },
    },
    'payment_type' : 'MT',
    'back_url'     : 'http://example.com'
  }
Android
  Sale sale = new Sale(19.99, "EUR", "Product #1");
  Address address = new Address("1600 Pennsylvania Avenue Northwest", "Washington", "DC", "500", "US");
  Customer customer = new Customer("John Doe", "john@doe.com", "127.0.0.1", address);
Simply call the bankTransferSale method. You can also check whether the sale was performed successfully, retrieve the transaction ID or error details, if anything goes wrong.
If the bankTransferSale method was performed successfully, you can redirect the customer to the bank’s website, where they’ll perform the payment.
Use the URL returned by the bankTransferSale.
Example
PHP
  try {
      $status = $client->bankTransferSale($bt_params);
  }
  catch (Exception $e) {
      // handle exceptions here
  }

  if ($client->isSuccess()) {
      echo "Success, transaction initiated, id_sale: {$status['id_sale']}, \n
            redirect_url: {$status['redirect_url']} \n";
  } else {
      die("Error ID: {$status['error']['id_error']}, \n".
          "Error number: {$status['error']['error_number']}, \n".
          "Error description: {$status['error']['error_description']}");
  }

  header('Location: ' . $status['redirect_url']);
  die;
Ruby
  begin
      status = client.bank_transfer_sale(bt_params)
  rescue PeP::ClientError => e
      # handle exceptions here
  end

  if client.success?
      puts "Success, transaction initiated, id_sale: #{status["id_sale"]}, "\
          "redirect_url: #{status["redirect_url"]}"
  else
      puts "Error ID: #{status["error"]["id_error"]}, \n"\
          "Error number: #{status["error"]["error_number"]}, \n"\
          "Error description: #{status["error"]["error_description"]}"
      exit
  end

  # redirect to url in status['redirect_url']
  exit
Python
  try:
      status = client.bank_transfer_sale(bt_params)
  except Exception, e:
      # handle exceptions here

  if client.is_success():
      print 'Success, transaction initiated, id_sale: %s, redirect_url: %s' % \
          (status['id_sale'], status['redirect_url'])
  else:
      sys.exit('Error ID: ' + str(status["error"]["id_error"]) + '\n' \
              'Error number: ' + str(status["error"]["error_number"]) + '\n' \
              'Error description: ' + str(status["error"]["error_description"]))

  # redirect to url in status['redirect_url']
  sys.exit()
Android
  api.bankTransferSale(sale, customer, "http://example-page.com", PaymentType.MT, new Callback<PayPalAuthorizationResult>() {

      @Override
      public void onFinish(PayPalAuthorizationResult result) {
          WebView webview =...;
          webview.loadUrl(result.getRedirectUrl());
      }

      @HandleException
      public void onProtocolError(ProtocolException e) {
          // invoke if not success
          // e.getCode() - error code
          // e.getMessage() - error message
      }

      @Override
      public void onError(Exception e) {
          // connection error etc.
      }
  });
After submitting the payment on the bank’s website, the customer will be redirected back to your site (the back_url, to be precise).
You should now verify the returned information to avoid any fraud attempts and check the transaction’s status.
Example code
PHP
  $salt        = 'YOUR_HASH_SALT';
  $status      = $_GET['status'];
  $description = $_GET['description'];
  $amount      = $_GET['amount'];
  $currency    = $_GET['currency'];
  $hash        = $_GET['hash'];

  $id = '';
  if ($status !== 'ERROR') // success, get id_sale
      $id = $_GET['id_sale'];

  $calc_hash = sha1("{$salt}|{$status}|{$description}|{$amount}|{$currency}|{$id}");

  // check hash salt
  if ( $calc_hash !== $hash ) {
      die ("Error, wrong hash");
  }

  // check transaction status
  switch ($status) {
      case 'ERROR':
          die("Error, transaction declined, {$_GET['error_text']}");
          break;

      case 'CLEARED':
          echo "Success, transaction completed, id_sale: {$_GET['id_sale']}";
          break;

      default:
          /* transaction pending:
          * check status regularly using the saleStatus method
          * or wait for notification */
          echo "Transaction pending";
          break;
  }
Ruby
  # Simple controller action code in Rails
  # it's just an example - most of the logic should be moved to model

  salt        = 'YOUR_HASH_SALT'
  status      = params['status']
  description = params['description']
  amount      = params['amount']
  currency    = params['currency']
  hash        = params['hash']

  id = ''
  unless status == 'ERROR'
      id = params['id_sale']
  else
      # redirect to an index action to correct the payment + simple notice
      # for rails: redirect_to :index, :notice => "Error, transaction declined, #{description}"
  end

  calc_hash = Digest::SHA1.hexdigest("#{salt}|#{status}|#{description}|#{amount}|#{currency}|#{id}")

  unless calc_hash == hash
      # redirect to an index action to correct the payment
      # for rails: redirect_to :index
  end

  # check transaction status

  case status
      when 'ERROR'
          # redirect to an index action to correct the payment + simple notice
          # for rails: redirect_to :index, :notice => "Error, transaction declined, #{response["error"]["error_text"]}"
      when 'CLEARED'
          # redirect to an index action to correct the payment + simple notice
          # for rails: redirect_to :index, :notice => "Success, transaction completed, id_sale: #{id}"
      else
          # redirect to an index action to correct the payment + simple notice
          # for rails: redirect_to :index, :notice => "Transaction pending"
  end
Python
  salt        = 'YOUR_HASH_SALT'
  status      = get_request_param('status')
  description = get_request_param('description')
  amount      = get_request_param('amount')
  currency    = get_request_param('currency')
  hash        = get_request_param('hash')
  id_sale     = None

  # success, get id_sale
  if status != 'ERROR':
      id_sale = get_request_param('id_sale')

  calc_hash = hashlib.sha1(
      '|'.join([salt, status, description, amount, currency, id_sale])).hexdigest()

  # check hash salt
  if calc_hash != hash:
      sys.exit('Error, wrong hash')

  # check transaction status
  if status == 'ERROR':
      sys.exit('Error, transaction declined, %s' % \
          get_request_param('error_text'))
  elif status == 'CLEARED':
      print 'Success, transaction completed, id_sale: %s' % id_sale
  else:
      # transaction pending: check status regularly using the saleStatus
      # method or wait for notification
      print 'Transaction pending'
Android
  webview.setWebViewClient(new WebViewClient() {
      @Override
      public boolean shouldOverrideUrlLoading(WebView view, String url) {

          if (url.contains(redirectUrl)) {
              try {
                  Map<String, String> map = getQueryMap(new URL(url).getQuery());
                  String salt = "YOUR_HASH_SALT";
                  String status = map.get("status");
                  String description = map.get("description");
                  String amount = map.get("amount");
                  String currency = map.get("currency");
                  String id = map.get("id_sale");

                  String calcHash = sha1(String.format("%1$s|%2$s|%3$s|%4$s|%5$s|%6$s", salt, status, description, amount, currency, id));

                  // check hash salt
                  if (!calcHash.equals(hash)) {
                      // Error, wrong hash
                  }

                  if (status.equals("ERROR")) {
                      String errorDescription=map.get("error_text");
                      // Error, transaction declined

                  } else if (status.equals("CLEARED")) {
                      String idSale=map.get("id_sale");
                      // Success, transaction completed

                  } else {
                          /* transaction pending:
                          * check status regularly using the saleStatus method
                          * or wait for notification */
                  }

              } catch (MalformedURLException e) {
                  e.printStackTrace();
              } catch (NoSuchAlgorithmException e) {
                  e.printStackTrace();
              } catch (UnsupportedEncodingException e) {
                  e.printStackTrace();
              }
          } else {
              view.loadUrl(url);
          }
          return true;
      }
  });

  public static Map<String, String> getQueryMap(String query) {
      String[] params = query.split("&");
      Map<String, String> map = new HashMap<String, String>();
      for (String param : params) {
          String name = param.split("=")[0];
          String value = param.split("=")[1];
          map.put(name, value);
      }
      return map;
  }

  private static String convertToHex(byte[] data) {
      StringBuilder buf = new StringBuilder();
      for (byte b : data) {
          int halfbyte = (b >>> 4) & 0x0F;
          int two_halfs = 0;
          do {
              buf.append((0 <= halfbyte) && (halfbyte <= 9) ? (char) ('0' + halfbyte) : (char) ('a' + (halfbyte - 10)));
              halfbyte = b & 0x0F;
          } while (two_halfs++ < 1);
      }
      return buf.toString();
  }

  public static String sha1(String text) throws NoSuchAlgorithmException, UnsupportedEncodingException {
      MessageDigest md = MessageDigest.getInstance("SHA-1");
      md.update(text.getBytes("utf-8"), 0, text.length());
      byte[] sha1hash = md.digest();
      return convertToHex(sha1hash);
  }
Check the transaction status by calling the getSaleInfo.
You can also check whether the transaction was performed successfully by calling the isSuccess method, retrieve additional information or possible error data.
Example code
PHP
  try {
      $status = $client->getSaleInfo(array('id_sale' => $id_sale));
  }
  catch (Exception $e) {
      // handle exceptions here
  }

  if ($client->isSuccess()) {
      if ('CLEARED' === $status['status']) {
          echo "Success, transaction completed, id_sale: {$id_sale}";
      }
  } else {
      die("Error ID: {$status['error']['id_error']}, \n".
          "Error number: {$status['error']['error_number']}, \n".
          "Error description: {$status['error']['error_description']}");
  }
Ruby
  begin
      status = client.get_sale_info({"id_sale" => id_sale})
  rescue PeP::ClientError => e
      # handle exceptions here
  end

  if client.success?
      puts "Success, transaction completed, id_sale: #{id_sale}" if status['status'] == 'CLEARED'
  else
      puts "Error ID: #{status["error"]["id_error"]}, \n"\
          "Error number: #{status["error"]["error_number"]}, \n"\
          "Error description: #{status["error"]["error_description"]}"
      exit
  end
Python
  try:
      status = client.get_sale_info({'id_sale': id_sale})
  except Exception, e:
      # handle exceptions here

  if client.is_success():
      if status['status'] == 'CLEARED':
          print 'Success, transaction completed, id_sale: %s' % id_sale
  else:
      sys.exit('Error ID: ' + str(status["error"]["id_error"]) + '\n' \
              'Error number: ' + str(status["error"]["error_number"]) + '\n' \
              'Error description: ' + str(status["error"]["error_description"]))
Android
  api.saleInfo(idSale, new Callback<SaleInfoResult>() {

      @Override
      public void onFinish(SaleInfoResult result) {
          // success
      }

      @HandleException
      public void onProtocolError(ProtocolException e) {
          // invoke if not success
          // e.getCode() - error code
          // e.getMessage() - error message
      }

      @Override
      public void onError(Exception e) {
          // connection error etc.
      }
  })
Instead of checking the transaction status manually, you can simply use the PeP notifications mechanism.
Our systems will send you the desired information using POST – there’s no need for you to send any requests.
Here’s an example of how you can check the communication and receive a notification:
Example code
PHP
  // check communication
  if (empty($_POST['communication_id'])) {
      die('Empty communication id');
  }

  // check if token correct
  if ('YOUR_TOKEN' !== $_POST['token']) {
      die('Wrong token');
  }

  foreach ($_POST['content'] as $notification) {
      if ($notification['type'] === 'S') { // sale created
          // transaction completed, do something useful with id_sale
          $id_sale = $notification['id_sale'];
      }
  }

  // return communication_id
  die($_POST['communication_id']);
Ruby
  # check communication
  if params['communication_id'].blank?
      puts "Empty communication id"
      exit
  end

  # check if token is correct
  unless 'YOUR_TOKEN' == params['token']
      puts "Wrong token"
      exit
  end

  @content = params['content']
  # You can do something useful in Rails view later on

  @content.each do |notification|
      @id_sale = notification['id_sale'] if notification['type'] == 'S'
  end

  # render :text => params['communication_id']
Python
  # check communication
  communication_id = get_request_param('communication_id')
  if not communication_id:
      sys.exit('Empty communication id')

  # check if token correct
  token = get_request_param('token')
  if token != 'YOUR_TOKEN':
      sys.exit('Wrong token')

  #content = get_request_param('content')
  content = [{'type': 'S', 'id_sale': 123456789}]
  for notification in content:
      if notification['type'] == 'S':  # sale created
          # transaction completed, do something useful with id_sale
          id_sale = notification['id_sale']

  # print communication_id
PayPal is one of the most popular online payment methods in the world. Known for its e-wallet, it also allows to accept card payments or perform recurring transactions. Quite often PayPal is chosen as the first payment method, but it also serves great as an additional payment channel.
Remember to ensure that the PeP Rest Client was properly initiated (with your user name and password) before you start calling API methods regarding PayPal transactions.
Example code
PHP
  include_once ('PePRestClient.php');
  $client = new PePRestClient('your_login', 'your_password');
Ruby
  require 'pep_client'
  client = PeP::Client.new('your_login', 'your_password')
Python
  from client import PePRestClient
  client = PePRestClient("your_login", "your_password")
Android
PePApi api = PePClientFactory.createClassicClient(context, "your_login", "your_password");
Prepare all the data required to perform the transaction as follows.
Example code
PHP
  $paypal_params = array(
      'sale'     => array(
          'amount'      => 19.99,
          'currency'    => 'EUR',
          'description' => 'Product #1'
      ),
      'back_url'  => 'http://example-page.com',
  );
Ruby
  paypal_params = {
      'sale' => {
          'amount'      => 19.99,
          'currency'    => 'EUR',
          'description' => 'Product #1'
      },
      'back_url' => 'http://example-page.com'
  }
Python
  paypal_params = {
    'sale' : {
      'amount'      : 19.99,
      'currency'    : 'EUR',
      'description' : 'Product #1'
    },
    'back_url' : 'http://example.com'
  }
Android
Sale sale = new Sale(19.99, "EUR", "Product #1");
Now simply perform the transaction using the paypalSale method.
You can check whether the transaction was performed successfully by calling the isSuccess method.
Retrieving the transaction ID number (or error details, if anything goes wrong) is also very simple and can be done as shown below.
If the paypalSale method was performed successfully, you can redirect the customer to the PayPal’s website, where they’ll perform the payment.
Use the URL returned by the paypalSale.
Example code
PHP
  try {
      $status = $client->paypalSale($paypal_params);
  } catch (Exception $e) {
      // handle exceptions here
  }

  if ($client->isSuccess()) {
      echo "Success, id_sale: {$status['id_sale']} \n";
  } else {
      die("Error ID: {$status['error']['id_error']}, \n".
          "Error number: {$status['error']['error_number']}, \n".
          "Error description: {$status['error']['error_description']}");
  }

  header('Location: ' . $status['redirect_url']);
  die;
Ruby
  begin
      status = client.paypal_sale(paypal_params)
  rescue PeP::ClientError => e
      # handle exceptions here
  end

  if client.success?
      puts "Success, id_sale: #{status["id_sale"]}"
  else
      puts "Error ID: #{status["error"]["id_error"]}, \n"\
          "Error number: #{status["error"]["error_number"]}, \n"\
          "Error description: #{status["error"]["error_description"]}"
  end

  # redirect to url in status['redirect_url']
  exit
Python
  try:
      status = client.paypal_sale(paypal_params)
  except Exception, e:
      # handle exceptions here

  if client.is_success():
      print 'Success, id_sale: %s' % status['id_sale']
  else:
      print 'Error (%s), %s - %s' % (status['error'].get('id_error'),
                                    status['error'].get('error_number'),
                                    status['error'].get('error_description'))

  # redirect to url in status['redirect_url']
  sys.exit()
Android
  api.payPalSale(sale,"http://example-page.com",new Callback<RedirectSaleResult>(){

      @Override
      public void onFinish(RedirectSaleResult result) {
          WebView webview =...;
          webview.loadUrl(result.getRedirectUrl());
      }

      @HandleException
      public void onProtocolError(ProtocolException e) {
          // invoke if not success
          // e.getCode() - error code
          // e.getMessage() - error message
      }

      @Override
      public void onError(Exception e) {
          // connection error etc.
      }
  });
Python note:
There is no native function in Python to redirect to another website – you either have to use a mechanism provided by the used framework or write a function that will suit you best.
For Django, you can use:
  from django.http import HttpResponseRedirect
  HttpResponseRedirect(status['redirect_url'])
For Pylons, you can use:
  from pylons.controllers.util import redirect
  redirect(status['redirect_url'])
After submitting the payment on the PayPal’s website, the customer will be redirected back to your site (the back_url, to be precise). You should now verify the returned information to avoid any fraud attempts and check the transaction’s status.
Example Code
PHP
  $salt        = 'YOUR_HASH_SALT';
  $status      = $_GET['status'];
  $description = $_GET['description'];
  $amount      = $_GET['amount'];
  $currency    = $_GET['currency'];
  $hash        = $_GET['hash'];

  $id = '';
  if ($status !== 'ERROR') // success, get id_sale
      $id = $_GET['id_sale'];

  $calc_hash = sha1("{$salt}|{$status}|{$description}|{$amount}|{$currency}|{$id}");

  // check hash salt
  if ( $calc_hash !== $hash ) {
      die ("Error, wrong hash");
  }

  // check transaction status
  switch ($status) {
      case 'PERFORMED':
          echo "Success, transaction completed, id_sale: {$_GET['id_sale']}";
          break;

      default:
          die("Error, transaction declined, {$_GET['error_description']}");
          break;
  }
Ruby
  # Simple controller action code in Rails
  # it's just an example - most of the logic should be moved to model

  salt        = 'YOUR_HASH_SALT'
  status      = params['status']
  description = params['description']
  amount      = params['amount']
  currency    = params['currency']
  hash        = params['hash']

  id = ''
  unless status == 'ERROR'
      id = params['id_sale']
  else
  # redirect to an index action to correct the payment + simple notice
  # for Rails: redirect_to :index, :notice => "Error, transaction declined, #{description}"
  end

  calc_hash = Digest::SHA1.hexdigest("#{salt}|#{status}|#{description}|#{amount}|#{currency}|#{id}")

  unless calc_hash == hash
  # redirect to an index action to correct payment
  # for Rails: redirect_to :index, :notice => "Wrong hash"
  end


  # check transaction status

  if status = 'PERFORMED'
  # redirect to some index action to correct payment and simple notice
  # for rails: redirect_to :index, :notice => "Success, transaction completed, id_sale: #{id}"
  else
  # redirect to some index action to correct payment and simple notice
  # for rails: redirect_to :index, :notice => "Transaction pending"
  end
Python
  # after back redirect
  salt        = 'YOUR_HASH_SALT'
  status      = get_request_param('status')
  description = get_request_param('description')
  amount      = get_request_param('amount')
  currency    = get_request_param('currency')
  hash        = get_request_param('hash')
  id_sale     = None

  # success, get id_sale
  if status != 'ERROR':
      id_sale = get_request_param('id_sale')

  calc_hash = hashlib.sha1(
      '|'.join([salt, status, description, amount, currency, id_sale])).hexdigest()

  # check hash salt
  if calc_hash != hash:
      sys.exit('Error, wrong hash')

  # check transaction status
  if status == 'PERFORMED':
      print 'Success, transaction completed, id_sale: %s' % id_sale
  else:
      sys.exit('Error, transaction declined, %s' % \
          get_request_param('error_description'))


  # Uwaga dot. Pythona:
  # Funkcja get_request_param ma za zadanie pobrać wartości GET. Użyj odpowiednich funkcji oferowanych przez framework, z którego korzystasz, lub napisz własną funkcję.

  # W przypadku Django możesz użyć:
  # param_from_get = request.GET.get('param_name')
  # W przypadku Pylons możesz użyć:
  # from pylons import request
  # param_from_get = request.GET.get('param_name')
Android
  api.payPalSale(sale,"http://example-page.com",new Callback<RedirectSaleResult>(){

      @Override
      public void onFinish(RedirectSaleResult result) {
          WebView webview =...;
          webview.loadUrl(result.getRedirectUrl());
      }

      @HandleException
      public void onProtocolError(ProtocolException e) {
          // invoke if not success
          // e.getCode() - error code
          // e.getMessage() - error message
      }

      @Override
      public void onError(Exception e) {
          // connection error etc.
      }
  });
Recurring payments are simply resales performed in specific time periods. You can perform them based on any conditions defined by your business model.
Normally PayPal recurring payments require recurring payment profiles. Such profiles allow PayPal to automatically initiate further payments according to instructions that are passed with the first transaction.
Notification configuration: In order to integrate PayPal recurring payments with PeP, you need to set the notifications in the PayPal account and point them to the PeP server: https://secure.pep.pl/paypalIPN.
Creating a PayPal recurring profile:
In order to create a PayPal recurring profile, we must add a recurring structure to the first PayPal transaction. The structure will define the properties of a profile, for example:
We have three parameters in the recurring structur:
amount– the amount that will be collected within every time period,start_date– date (YYYY-MM-DD format) that defines the beginning of the cycle,period– defines the payment frequency; acceptable values:day,week,month,year.
Example code
PHP
  $paypal_params = array(
      'sale'     => array(
          'amount'      => 19.99,
          'currency'    => 'EUR',
          'description' => 'Product #1'
      ),
      'back_url'  => 'http://example-page.com',
      'recurring' => array(
          'amount'     => '19.99',
          'start_date' => '2014-11-01',
          'period'     => 'month'
      ),
  );
Ruby
  paypal_params = {
      'sale' => {
          'amount'      => 19.99,
          'currency'    => 'EUR',
          'description' => 'Product #1'
      },
      'back_url' => 'http://example-page.com',
      'recurring' => array(
          'amount'     => '19.99',
          'start_date' => '2014-11-01',
          'period'     => 'month'
      )
  }
Python
  paypal_params = {
    'sale' : {
      'amount'      : 19.99,
      'currency'    : 'EUR',
      'description' : 'Product #1'
    },
    'back_url' : 'http://example.com',
    'recurring' : {
      'amount'     => '19.99',
      'start_date' => '2014-11-01',
      'period'     => 'month'
    }
  }
Reference transactions (resales that refer to previous payments) are a more flexible solution addressed to experienced merchants – they are the ones who initiate every transaction. This means that merchants have to implement such functionalities on their own.
What is more, merchants have to contact PayPal to have the reference transactions activated. An appropriate monthly turnover (e.g. USD 100 000) is required and it is PayPal’s decision whether reference transactions will be turned on.
Resales do not require all the customer/transaction information. That is why they have to refer to a single transaction performed previously.
Start with preparing the necessary information to perform a resale. In order to do that you must first retrieve the ID number of a previous transaction. This ID number identifies the transaction in PeP's systems. You can easily retrieve this number while performing the transaction, for example:
Example code
PHP
  $status = $client->paypalSale($paypal_params);
  $id_first_sale = $status['id_sale'];
Ruby
  status = client.paypal_sale(paypal_params)
  id_first_sale = status['id_sale']
Python
  status = client.paypal_sale(paypal_params)
  id_first_sale = status['id_sale']
Android
  api.payPalSale(sale,"http://example-page.com",new Callback<RedirectSaleResult>() {
      @Override
      public void onFinish(RedirectSaleResult result) {
          long idSale=result.getIdSale();
      }
  });
See the Single transaction page for more details on performing a single sale. Although you can refer to any previous transaction ID to perform a resale, we highly recommend to refer to the most recent transaction. This approach has several advantages, for example allows to easily track the transaction flow.
Usually merchants store such ID numbers in their database. This way they do not have to store any sensitive data, yet they are still able to refer to a specific transaction.
Now, having retrieved the ID number (e.g. from your database), prepare information and perform the resale (call the resaleBySale function).
You can also check whether the transaction was performed successfully by calling the isSuccess method. Retrieving the transaction ID number (or error details, if anything goes wrong) is also very simple and can be done as shown below.
Example code
PHP
        $resale_params = array(
      'id_sale'     => $id_first_sale,
      'amount'      => 99.99,
      'currency'    => 'EUR',
      'description' => 'Recurring billing product #1',
  );

  try {
      $status = $client->resaleBySale($resale_params);
  } catch (Exception $e) {
      // handle exceptions here
  }

  if ($client->isSuccess()) {
      echo "Success, second id_sale: {$status['id_sale']} \n";
  } else {
      die("Error ID: {$status['error']['id_error']}, \n".
          "Error number: {$status['error']['error_number']}, \n".
          "Error description: {$status['error']['error_description']}");
  }
Ruby
  resale_params = {
      'id_sale'     => id_first_sale,
      'amount'      => 99.99,
      'currency'    => 'EUR',
      'description' => 'Recurring billing product #1'
  }

  begin
      status = client.resale_by_sale(resale_params)
  rescue PeP::ClientError => e
      # handle exceptions here
  end

  if client.success?
      puts "Success, id_second_sale: #{status["id_sale"]}"
  else
      puts "Error ID: #{status["error"]["id_error"]}, \n"\
          "Error number: #{status["error"]["error_number"]}, \n"\
          "Error description: #{status["error"]["error_description"]}"
      exit
  end
Python
  resale_params = {
    'id_sale'     : id_first_sale,
    'amount'      : 99.99,
    'currency'    : 'EUR',
    'description' : 'Recurring billing product #1'
  }

  try:
      status = client.resale_by_sale(resale_params)
  except Exception, e:
      # handle exceptions here

  if client.is_success():
      print 'Success, second id_sale: %s' % status['id_sale']
  else:
      sys.exit('Error ID: ' + str(status["error"]["id_error"]) + '\n' \
              'Error number: ' + str(status["error"]["error_number"]) + '\n' \
              'Error description: ' + str(status["error"]["error_description"]))
Android
  api.resaleSale(idSale, 99.99, "EUR", "Recurring billing product #1", new Callback<FraudSaleResult>() {

      @Override
      public void onFinish(FraudSaleResult result) {
          // success
      }

      @HandleException
      public void onProtocolError(ProtocolException e) {
          // invoke if not success
          // e.getCode() - error code
          // e.getMessage() - error message
      }

      @Override
      public void onError(Exception e) {
          // connection error etc.
      }
  });
Recurring payments are just resales performed periodically. It’s your choice whether you want to do this weekly, monthly or annually; it is also possible to perform a resale e.g. when a customer reaches a certain amount that should be paid.
There are cases when you want to return customer’s money – either the whole amount or just a part of it. This is exactly what a refund is for – it allows you to return funds in reference to a specific transaction.
In order to perform a refund, you must know the transaction ID number. This ID number identifies the transaction in PeP's systems. You can easily retrieve this number while performing the transaction, for example:
Example code
PHP
  $status = $client->paypalSale($paypal_params);
  $id_sale = $status['id_sale'];
Ruby
  status = client.paypal_sale(paypal_params)
  id_sale = status['id_sale']
Python
  status = client.paypal_sale(paypal_params)
  id_sale = status['id_sale']
Android
  api.payPalSale(sale,"http://example-page.com",new Callback<RedirectSaleResult>() {
      @Override
      public void onFinish(RedirectSaleResult result) {
          long idSale=result.getIdSale();
      }
  });
See the Single transaction page for more details on performing a single sale. Usually merchants store such ID numbers in their database. This way they do not have to store any sensitive data, yet they are still able to refer to a specific transaction.
Now prepare the required data required and perform the refund (call the refund method.).
Note that you can provide the amount of the transaction or less; if you enter a greater value than the transaction amount, you will receive an error message. You can also specify the refund’s reason and currency.
Just like with any other transaction, you can also check whether the refund was performed successfully by calling the isSuccess method.
Retrieving the refund ID number (or error details, if anything goes wrong) is also very simple and can be done as shown below.
Example code
PHP
  $refund_params = array(
      'id_sale'  => $id_sale,
      'amount'   => 9.99,
      'reason'   => 'Partial refund',
  );

  try {
      $status = $client->refund($refund_params);
  } catch (Exception $e) {
      // handle exceptions here
  }

  if ($client->isSuccess()) {
      echo "Success, id_refund: {$status['id_refund']} \n";
  } else {
      die("Error ID: {$status['error']['id_error']}, \n".
          "Error number: {$status['error']['error_number']}, \n".
          "Error description: {$status['error']['error_description']}");
  }
Ruby
  refund_params = {
      'id_sale' => id_sale,
      'amount'  => 9.99,
      'reason'  => 'Partial refund.'
  }

  begin
      status = client.refund(refund_params)
  rescue PeP::ClientError => e
      # handle exceptions here
  end

  if client.success?
      puts "Success, id_refund: #{status["id_refund"]}"
  else
      puts "Error ID: #{status["error"]["id_error"]}, \n"\
          "Error number: #{status["error"]["error_number"]}, \n"\
          "Error description: #{status["error"]["error_description"]}"
      exit
  end
Python
  refund_params = {
    'id_sale'  : id_sale,
    'amount'   : 9.99,
    'reason'   : 'Partial refund'
  }

  try:
      status = client.refund(refund_params)
  except Exception, e:
      # handle exceptions here

  if client.is_success():
      print 'Success, id_refund: %s' % status['id_refund']
  else:
      sys.exit('Error ID: ' + str(status["error"]["id_error"]) + '\n' \
              'Error number: ' + str(status["error"]["error_number"]) + '\n' \
              'Error description: ' + str(status["error"]["error_description"]))
Android
  api.refund(idSale, 9.99, "EUR", "Partial refund", new Callback<FraudSaleResult>() {

      @Override
      public void onFinish(FraudSaleResult result) {
          // success
      }

      @HandleException
      public void onProtocolError(ProtocolException e) {
          // invoke if not success
          // e.getCode() - error code
          // e.getMessage() - error message
      }

      @Override
      public void onError(Exception e) {
          // connection error etc.
      }
  });
You may wish not to charge a customer, but only authorize the amount. This may be useful in some business scenarios, when you want to block funds and charge it (or part of it) later.
Prepare the data required to perform the authorization. Note that the data comes in exactly the same format as when performing a regular transaction.
Example code
PHP
  $paypal_params = array(
      'sale'     => array(
          'amount'      => 19.99,
          'currency'    => 'EUR',
          'description' => 'Product #1'
      ),
      'back_url'  => 'http://example-page.com',
  );
Ruby
  paypal_params = {
      'sale' => {
          'amount'      => 19.99,
          'currency'    => 'EUR',
          'description' => 'Product #1'
      },
      'back_url' => 'http://example-page.com'
  }
Python
  paypal_params = {
    'sale' : {
      'amount'      : 19.99,
      'currency'    : 'EUR',
      'description' : 'Product #1'
    },
    'back_url' : 'http://example.com'
  }
Android
Sale sale = new Sale(19.99, "EUR", "Product #1");
Having the data prepared, simply call the paypalAuthorization method (just like you would do with the paypalSale method).
You can also easily check whether the authorization was successful and retrieve the ID number – you can use it later to perform resales within the recurring payments.
Example code
PHP
  try {
      $status = $client->paypalAuthorization($paypal_params);
  } catch (Exception $e) {
      // handle exceptions here
  }

  if ($client->isSuccess()) {
      echo "Success, id_authorization: {$status['id_authorization']} \n";
  } else {
      die("Error ID: {$status['error']['id_error']}, \n".
          "Error number: {$status['error']['error_number']}, \n".
          "Error description: {$status['error']['error_description']}");
  }
Ruby
  begin
      status = client.paypal_authorization(paypal_params)
  rescue PeP::ClientError => e
      # handle exceptions here
  end

  if client.success?
      puts "Success, id_authorization: #{status["id_authorization"]}"
  else
      puts "Error ID: #{status["error"]["id_error"]}, \n"\
          "Error number: #{status["error"]["error_number"]}, \n"\
          "Error description: #{status["error"]["error_description"]}"
      exit
  end
Python
  try:
      status = client.paypal_authorization(paypal_params)
  except Exception, e:
      # handle exceptions here

  if client.is_success():
      print 'Success, id_authorization: %s' % status['id_authorization']
  else:
      sys.exit('Error ID: ' + str(status["error"]["id_error"]) + '\n' \
              'Error number: ' + str(status["error"]["error_number"]) + '\n' \
              'Error description: ' + str(status["error"]["error_description"]))
Android
  api.payPalAuthorization(sale, "http://example-page.com", new Callback<PayPalAuthorizationResult>() {
      @Override
      public void onFinish(PayPalAuthorizationResult result) {
          // success
      }

      @HandleException
      public void onProtocolError(ProtocolException e) {
          // invoke if not success
          // e.getCode() - error code
          // e.getMessage() - error message
      }

      @Override
      public void onError(Exception e) {
          // connection error etc.
      }
  });
Direct debits are popular in some European countries (e.g. Germany). There are some similarities to card payments (e.g. reversals, which are equivalents of chargebacks), but funds are not charged from a card, but directly from a bank account.
For all direct debits methods in PeP API, you must ensure that the Rest Client is initialized. Simply include a proper file and provide your user name and password.
Example code
PHP
  include_once ('PePRestClient.php');
  $client = new PePRestClient('your_login', 'your_password');
Ruby
  require 'pep_client'
  client = PeP::Client.new('your_login', 'your_password')
Python
  from client import PePRestClient
  client = PePRestClient("your_login", "your_password")
Android
PePApi api = PePClientFactory.createClassicClient(context, "your_login", "your_password");
Prepare all the data required to perform the transaction as follows. As you can see, in case of direct debits there are three sets of information: sale, customer and account data.
Example code
PHP
  $ddebit_params = array(
      'sale' => array(
          'amount'      => 19.99,
          'currency'    => 'EUR',
          'description' => 'Product #1'
      ),
      'customer' => array(
          'name'    => 'Hans Muller',
          'email'   => 'hans@muller.de',
          'ip'      => '127.0.0.1',
          'address' => array (
              'street_house' => 'Platz der Republik 1',
              'city'         => 'Berlin',
              'state'        => 'Berlin',
              'zip'          => '11011',
              'country_code' => 'DE',
          ),
      ),
      'account' => array(
          'account_holder'  => 'Hans Muller',
          'account_country' => 'DE',
          'iban'            => 'DE12345678901234567890',
          'bic'             => 'BICBICDE',
          'mandate_id'      => '54321',
      ),
  );
Ruby
  ddebit_params = {
      'sale'=> {
          'amount'      => 19.99,
          'currency'    => 'EUR',
          'description' => 'Product #1'
      },
      'customer' => {
          'name'    => 'Hans Muller',
          'email'   => 'hans@muller.de',
          'ip'      => '127.0.0.1',
          'address' => {
              'street_house' => 'Platz der Republik 1',
              'city'         => 'Berlin',
              'state'        => 'Berlin',
              'zip'          => '11011',
              'country_code' => 'DE'
          }
      },
      'account' => {
          'account_holder'  => 'Hans Muller',
          'account_country' => 'DE',
          'iban'            => 'DE12345678901234567890',
          'bic'             => 'BICBICDE',
          'mandate_id'      => '54321'
      }
  }
Python
  ddebits_params = {
    'sale' : {
      'amount'      : 19.99,
      'currency'    : 'EUR',
      'description' : 'Product #1'
    }
    'customer' : {
      'name'  : 'Hans Muller',
      'email' : 'hans@muller.de',
      'ip'    : '127.0.0.1',
      'address' : {
        'street_house' : 'Platz der Republik 1',
        'city'         : 'Berlin',
        'state'        : 'Berlin',
        'zip'          : '500',
        'country_code' : 'DE'
      },
    },
    'account' : {
      'account_holder'  : 'Hans Muller',
      'account_country' : 'DE',
      'iban'            : 'DE12345678901234567890',
      'bic'             : 'BICBICDE',
      'mandate_id'      : '54321'
    }
  }
Android
  Sale sale         = new Sale(19.99, "EUR", "Product #1");
  Address address   = new Address("1600 Pennsylvania Avenue Northwest", "Washington", "DC", "500", "US");
  Customer customer = new Customer("John Doe", "john@doe.com", "127.0.0.1", address);
  Account account   = new Account("Hans Muller","de","DE12345678901234567890","BICBICDE","54321");
Now simply perform the transaction using the directDebitSale method.
You can check whether the transaction was performed successfully by calling the isSuccess method.
Retrieving the transaction ID number (or error details, if anything goes wrong) is also very simple and can be done as shown below.
Example code
PHP
  try {
      $status = $client->directDebitSale($ddebit_params);
  } catch (Exception $e) {
      // handle exceptions here
  }

  if ($client->isSuccess()) {
      echo "Success, id_sale: {$status['id_sale']} \n";
  } else {
      die("Error ID: {$status['error']['id_error']}, \n".
          "Error number: {$status['error']['error_number']}, \n".
          "Error description: {$status['error']['error_description']}");
  }
Ruby
  begin
      status = client.direct_debit_sale(ddebit_params)
  rescue PeP::ClientError => e
      # handle exceptions here
  end

  if client.success?
      puts "Success, id_sale: #{status["id_sale"]}"
  else
      puts "Error ID: #{status["error"]["id_error"]}, \n"\
          "Error number: #{status["error"]["error_number"]}, \n"\
          "Error description: #{status["error"]["error_description"]}"
      exit
  end
Python
  try:
      status = client.direct_debit_sale(ddebits_params)
  except Exception, e:
      # handle exceptions here

  if client.is_success():
      print 'Success, id_sale: %s' % status['id_sale']
  else:
      sys.exit('Error ID: ' + str(status["error"]["id_error"]) + '\n' \
              'Error number: ' + str(status["error"]["error_number"]) + '\n' \
              'Error description: ' + str(status["error"]["error_description"]))
Android
  api.directDebitSale(sale, customer, account, new Callback<SaleResult>() {

      @Override
      public void onFinish(SaleResult result) {
          // success
      }

      @HandleException
      public void onProtocolError(ProtocolException e) {
          // invoke if not success
          // e.getCode() - error code
          // e.getMessage() - error message
      }

      @Override
      public void onError(Exception e) {
          // connection error etc.
      }
  });
You can find all the structures’ descriptions in the REST Function Reference manual.
Note that a direct debit sale is marked as pending when performed.
You can check it’s status (and whether it changed to performed, cleared etc.) using the getSaleInfo method:
Just like there are chargebacks in card payments, there are reversals in direct debit transactions.
It is highly recommended to check direct debit transactions statuses after performing them in order to determine whether a reversal occurred or not. You can check this manually in the Merchant Panel, but also via API.
If you want to use our API to check a direct debit status, simply use the getSaleInfo:
Example code
PHP
  try {
      $sale_info = $client->getSaleInfo(array('id_sale' => $id_sale));
  }
  catch (Exception $e) {
      // handle exceptions here
  }
Ruby
  begin
      status = client.get_sale_info({"id_sale" => id_sale})
  rescue PeP::ClientError => e
      # handle exceptions here
  end
Python
  try:
      sale_info = client.get_sale_info({'id_sale': id_sale})
  except Exception, e:
      # handle exceptions here
Android
  api.saleInfo(idSale, new Callback<SaleInfoResult>() {
      @Override
      public void onFinish(SaleInfoResult result) {
          // success
      }

      @HandleException
      public void onProtocolError(ProtocolException e) {
          // invoke if not success
          // e.getCode() - error code
          // e.getMessage() - error message
      }

      @Override
      public void onError(Exception e) {
          // connection error etc.
      }
  });
Now simply check whether the field is_reversal in sale_info is set to true or false.
You can also use PeP notifications to check the status automatically. This way you won’t need to send any requests – you’ll receive a notification when a transaction status changes.
Recurring payments are simply resales performed in specific time periods. You can perform them based on any conditions defined by your business model.
Resales do not require all the customer/transaction information. That is why they have to refer to a single transaction performed previously.
Start with preparing the necessary information to perform a resale. In order to do that you must first retrieve the ID number of a previous transaction. This ID number identifies the transaction in PeP's systems. You can easily retrieve this number while performing the transaction, for example:
Example code
PHP
  $status = $client->directDebitSale($ddebit_params);
  $id_first_sale = $status['id_sale'];
Ruby
  status = client.direct_debit_sale(ddebit_params)
  d_first_sale = status["id_sale"]
Python
  status = client.direct_debit_sale(ddebit_params)
  id_first_sale = status['id_sale']
Android
  api.directDebitSale(sale, customer, account, new Callback<SaleResult>() {
      @Override
      public void onFinish(SaleResult result) {
          long idSale=result.getIdSale();
      }
  });
See the Single transaction page for more details on performing a single sale. Although you can refer to any previous transaction ID to perform a resale, we highly recommend to refer to the most recent transaction. This approach has several advantages, for example allows to easily track the transaction flow.
Usually merchants store such ID numbers in their database. This way they do not have to store any sensitive data, yet they are still able to refer to a specific transaction.
Now, having retrieved the ID number (e.g. from your database), prepare information for the resale and call the resaleBySale function.
You can also check whether the transaction was performed successfully by calling the isSuccess method.
Retrieving the transaction ID number (or error details, if anything goes wrong) is also very simple and can be done as shown below.
Example code
PHP
  $resale_params = array(
      'id_sale'     => $id_first_sale,
      'amount'      => 99.99,
      'currency'    => 'EUR',
      'description' => 'Recurring billing product #1',
  );

  try {
      $status = $client->resaleBySale($resale_params);
  } catch (Exception $e) {
      // handle exceptions here
  }

  if ($client->isSuccess()) {
      echo "Success, second id_sale: {$status['id_sale']} \n";
  } else {
      die("Error ID: {$status['error']['id_error']}, \n".
          "Error number: {$status['error']['error_number']}, \n".
          "Error description: {$status['error']['error_description']}");
  }
Ruby
  resale_params = {
      'id_sale'     => id_first_sale,
      'amount'      => 99.99,
      'currency'    => 'EUR',
      'description' => 'Recurring billing product #1'
  }

  begin
      status = client.resale_by_sale(resale_params)
  rescue PeP::ClientError => e
      # handle exceptions here
  end

  if client.success?
      puts "Success, id_second_sale: #{status["id_sale"]}"
  else
      puts "Error ID: #{status["error"]["id_error"]}, \n"\
          "Error number: #{status["error"]["error_number"]}, \n"\
          "Error description: #{status["error"]["error_description"]}"
      exit
  end
Python
  resale_params = {
    'id_sale'     : id_first_sale,
    'amount'      : 99.99,
    'currency'    : 'EUR',
    'description' : 'Recurring billing product #1'
  }

  try:
      status = client.resale_by_sale(resale_params)
  except Exception, e:
      # handle exceptions here

  if client.is_success():
      print 'Success, second id_sale: %s' % status['id_sale']
  else:
      sys.exit('Error ID: ' + str(status["error"]["id_error"]) + '\n' \
              'Error number: ' + str(status["error"]["error_number"]) + '\n' \
              'Error description: ' + str(status["error"]["error_description"]))
Android
  api.resaleSale(idSale, 99.99, "EUR", "Recurring billing product #1", new Callback<FraudSaleResult>() {

      @Override
      public void onFinish(FraudSaleResult result) {
          // success
      }

      @HandleException
      public void onProtocolError(ProtocolException e) {
          // invoke if not success
          // e.getCode() - error code
          // e.getMessage() - error message
      }

      @Override
      public void onError(Exception e) {
          // connection error etc.
      }
  });
Recurring payments are just resales performed periodically. It’s your choice whether you want to do this weekly, monthly or annually; it is also possible to perform a resale e.g. when a customer reaches a certain amount that should be paid.
There are cases when you want to return customer’s money – either the whole amount or just a part of it. This is exactly what a refund is for – it allows you to return funds in reference to a specific transaction.
In order to perform a refund, you must know the transaction ID number. This ID number identifies the transaction in PeP's systems. You can easily retrieve this number while performing the transaction, for example:
Example code
PHP
  $status = $client->directDebitSale($ddebit_params);
  $id_sale = $status['id_sale'];
Ruby
  status = client.direct_debit_sale(ddebit_params)
  id_sale = status["id_sale"]
Python
  status = client.direct_debit_sale(ddebit_params)
  id_sale = status['id_sale']
Android
  api.directDebitSale(sale, customer, account, new Callback<SaleResult>() {
      @Override
      public void onFinish(SaleResult result) {
          long idSale=result.getIdSale();
      }
  });
See the Single transaction page for more details on performing a single sale. Usually merchants store such ID numbers in their database. This way they do not have to store any sensitive data, yet they are still able to refer to a specific transaction.
Now prepare the data required to perform the refund.
Note that you can provide the amount of the transaction or less; if you enter a greater value than the transaction amount, you will receive an error message.
You can also specify the refund’s reason and currency.
Simply call the refund method. Just like with any other transaction, you can also check whether the refund was performed successfully by calling the isSuccess method.
Retrieving the refund ID number (or error details, if anything goes wrong) is also very simple and can be done as shown below.
Example code
PHP
  $refund_params = array(
      'id_sale'  => $id_sale,
      'amount'   => 9.99,
      'reason'   => 'Partial refund',
  );

  try {
      $status = $client->refund($refund_params);
  } catch (Exception $e) {
      // handle exceptions here
  }

  if ($client->isSuccess()) {
      echo "Success, id_refund: {$status['id_refund']} \n";
  } else {
      die("Error ID: {$status['error']['id_error']}, \n".
          "Error number: {$status['error']['error_number']}, \n".
          "Error description: {$status['error']['error_description']}");
  }
Ruby
  refund_params = {
      'id_sale'  => id_sale,
      'amount'   => 9.99,
      'reason'   => 'Partial refund.'
  }

  begin
      status = client.refund(refund_params)
  rescue PeP::ClientError => e
      # handle exceptions here
  end

  if client.success?
      puts "Success, id_refund: #{status["id_refund"]}"
  else
      puts "Error ID: #{status["error"]["id_error"]}, \n"\
          "Error number: #{status["error"]["error_number"]}, \n"\
          "Error description: #{status["error"]["error_description"]}"
      exit
  end
Python
  refund_params = {
    'id_sale'  : id_sale,
    'amount'   : 9.99,
    'reason'   : 'Partial refund'
  }

  try:
      status = client.refund(refund_params)
  except Exception, e:
      # handle exceptions here

  if client.is_success():
      print 'Success, id_refund: %s' % status['id_refund']
  else:
      sys.exit('Error ID: ' + str(status["error"]["id_error"]) + '\n' \
              'Error number: ' + str(status["error"]["error_number"]) + '\n' \
              'Error description: ' + str(status["error"]["error_description"]))
Android
  api.refund(idSale, 9.99, "EUR", "Partial refund", new Callback<FraudSaleResult>() {

      @Override
      public void onFinish(FraudSaleResult result) {
          // success
      }

      @HandleException
      public void onProtocolError(ProtocolException e) {
          // invoke if not success
          // e.getCode() - error code
          // e.getMessage() - error message
      }

      @Override
      public void onError(Exception e) {
          // connection error etc.
      }
  });
SOFORT Banking is an international direct payment system available in a number of European countries: Germany, Austria, Switzerland, Netherlands, UK, Belgium, France, Italy, Poland and Spain.
Before calling any API methods, please make sure that you have properly initiated the PeP Rest Client as follows:
Example code
PHP
  include_once ('PePRestClient.php');
  $client = new PePRestClient('your_login', 'your_password');
Ruby
  require 'pep_client'
  client = PeP::Client.new('your_login', 'your_password')
Python
  from client import PePRestClient
  client = PePRestClient("your_login", "your_password")
Android
PePApi api = PePClientFactory.createClassicClient(context, "your_login", "your_password");
Start with preparing information required to perform a SOFORT transaction. Provide sale and customer data, specify the payment type to choose a bank and define a back url – customers will be redirected to this website after submitting the payment.
Example code
PHP
  $sofort_params = array(
      'sale' => array(
          'amount'      => 19.99,
          'currency'    => 'PLN',
          'description' => 'Product #1'
      ),
      'customer' => array(
          'name'    => 'John Doe',
          'email'   => 'john@doe.com',
          'ip'      => '127.0.0.1',
          'address' => array (
              'street_house' => '1600 Pennsylvania Avenue Northwest',
              'city'         => 'Washington',
              'state'        => 'DC',
              'zip'          => '500',
              'country_code' => 'US',
          ),
      ),
      'back_url'     => 'http://example-page.com',
  );
Ruby
  sofort_params = {
      'sale' => {
          'amount'      => 19.99,
          'currency'    => 'PLN',
          'description' => 'Product #1'
      },
      'customer' => {
          'name'    => 'John Doe',
          'email'   => 'john@doe.com',
          'ip'      => '127.0.0.1',
          'address' => array (
              'street_house' => '1600 Pennsylvania Avenue Northwest',
              'city'         => 'Washington',
              'state'        => 'DC',
              'zip'          => '500',
              'country_code' => 'US'
          }
      },
      'back_url' => 'http://example-page.com'
  }
Python
  bt_params = {
    'sale' : {
      'amount'      : 19.99,
      'currency'    : 'PLN',
      'description' : 'Product #1'
    },
    'customer' : {
      'name'    : 'John Doe'
      'email'   : 'john@doe.com',
      'ip'      : '127.0.0.1',
      'address' : {
        'street_house' : '1600 Pennsylvania Avenue Northwest',
        'city'         : 'Washington',
        'state'        : 'DC',
        'zip'          : '500'
        'country_code' : 'US'
      },
    },
    'back_url'     : 'http://example.com'
  }
Android
  Sale sale         = new Sale(19.99, "EUR", "Product #1");
  Address address   = new Address("1600 Pennsylvania Avenue Northwest", "Washington", "DC", "500", "US");
  Customer customer = new Customer("John Doe", "john@doe.com", "127.0.0.1", address);
Simply call the sofortSale method. You can also check whether the sale was performed successfully, retrieve the transaction ID or error details, if anything goes wrong.
If the sofortSale method was performed successfully, you can now redirect the customer to the bank’s website, where they’ll perform the payment. Use the URL returned by the sofortSale.
Example code
PHP
  try {
      $status = $client->sofortSale($bt_params);
  }
  catch (Exception $e) {
      // handle exceptions here
  }

  if ($client->isSuccess()) {
      echo "Success, transaction initiated, id_sale: {$status['id_sale']}, \n
            redirect_url: {$status['redirect_url']} \n";
  } else {
      die("Error ID: {$status['error']['id_error']}, \n".
          "Error number: {$status['error']['error_number']}, \n".
          "Error description: {$status['error']['error_description']}");
  }

  header('Location: ' . $status['redirect_url']);
  die;
Ruby
  begin
      status = client.sofort_sale(bt_params)
  rescue PeP::ClientError => e
      # handle exceptions here
  end

  if client.success?
      puts "Success, transaction initiated, id_sale: #{status["id_sale"]}"\
          "redirect_url: #{status["redirect_url"]}"
  else
      puts "Error ID: #{status["error"]["id_error"]}, \n"\
          "Error number: #{status["error"]["error_number"]}, \n"\
          "Error description: #{status["error"]["error_description"]}"
      exit
  end

  # redirect to url in status['redirect_url']
  exit
Python
  try:
      status = client.sofort_sale(bt_params)
  except Exception, e:
      # handle exceptions here

  if client.is_success():
      print 'Success, transaction initiated, id_sale: %s, redirect_url: %s' % \
          (status['id_sale'], status['redirect_url'])
  else:
      sys.exit('Error ID: ' + str(status["error"]["id_error"]) + '\n' \
              'Error number: ' + str(status["error"]["error_number"]) + '\n' \
              'Error description: ' + str(status["error"]["error_description"]))

  # redirect to url in status['redirect_url']
  sys.exit()
Android
  api.sofortSale(sale, customer, "http://example-page.com", new Callback<RedirectSaleResult>() {

      @Override
      public void onFinish(RedirectSaleResult result) {
          WebView webview =...;
          webview.loadUrl(result.getRedirectUrl());
      }

      @HandleException
      public void onProtocolError(ProtocolException e) {
          // invoke if not success
          // e.getCode() - error code
          // e.getMessage() - error message
      }

      @Override
      public void onError(Exception e) {
          // connection error etc.
      }
  });
After submitting the payment on the bank’s website, the customer will be redirected back to your site (the back_url, to be precise). You should now verify the returned information to avoid any fraud attempts and check the transaction’s status.
Example code
PHP
  $salt        = 'YOUR_HASH_SALT';
  $status      = $_GET['status'];
  $description = $_GET['description'];
  $amount      = $_GET['amount'];
  $currency    = $_GET['currency'];
  $hash        = $_GET['hash'];

  $id = '';
  if ($status !== 'ERROR') // success, get id_sale
      $id = $_GET['id_sale'];

  $calc_hash = sha1("{$salt}|{$status}|{$description}|{$amount}|{$currency}|{$id}");

  // check hash salt
  if ( $calc_hash !== $hash ) {
      die ("Error, wrong hash");
  }

  // check transaction status
  switch ($status) {
      case 'ERROR':
          die("Error, transaction declined, {$_GET['error_description']}");
          break;

      case 'CLEARED':
          echo "Success, transaction completed, id_sale: {$_GET['id_sale']}";
          break;

      default:
          /* transaction pending:
          * check status regularly using the saleStatus method
          * or wait for notification */
          echo "Transaction pending";
          break;
  }
Ruby
  # Simple controller action code in Rails
  # it's just an example - most of the logic should be moved to model

  salt        = 'YOUR_HASH_SALT'
  status      = params['status']
  description = params['description']
  amount      = params['amount']
  currency    = params['currency']
  hash        = params['hash']

  id = ''
  unless status == 'ERROR'
      id = params['id_sale']
  else
      # redirect to an index action to correct the payment + simple notice
      # for rails: redirect_to :index, :notice => "Error, transaction declined, #{description}"
  end

  calc_hash = Digest::SHA1.hexdigest("#{salt}|#{status}|#{description}|#{amount}|#{currency}|#{id}")

  unless calc_hash == hash
      # redirect to an index action to correct the payment
      # for rails: redirect_to :index
  end

  # check transaction status

  case status
      when 'ERROR'
          # redirect to an index action to correct the payment + simple notice
          # for rails: redirect_to :index, :notice => "Error, transaction declined, #{response["error"]["error_description"]}"
      when 'CLEARED'
          # redirect to an index action to correct the payment + simple notice
          # for rails: redirect_to :index, :notice => "Success, transaction completed, id_sale: #{id}"
      else
          # redirect to an index action to correct the payment + simple notice
          # for rails: redirect_to :index, :notice => "Transaction pending"
  end
Python
  salt        = 'YOUR_HASH_SALT'
  status      = get_request_param('status')
  description = get_request_param('description')
  amount      = get_request_param('amount')
  currency    = get_request_param('currency')
  hash        = get_request_param('hash')
  id_sale     = None

  # success, get id_sale
  if status != 'ERROR':
      id_sale = get_request_param('id_sale')

  calc_hash = hashlib.sha1(
      '|'.join([salt, status, description, amount, currency, id_sale])).hexdigest()

  # check hash salt
  if calc_hash != hash:
      sys.exit('Error, wrong hash')

  # check transaction status
  if status == 'ERROR':
      sys.exit('Error, transaction declined, %s' % \
          get_request_param('error_description'))
  elif status == 'CLEARED':
      print 'Success, transaction completed, id_sale: %s' % id_sale
  else:
      # transaction pending: check status regularly using the saleStatus
      # method or wait for notification
      print 'Transaction pending'


  # Uwaga dot. Pythona:
  # Funkcja get_request_param ma za zadanie pobrać wartości GET. Użyj odpowiednich funkcji oferowanych przez framework, z którego korzystasz, lub napisz własną funkcję.

  # W przypadku Django możesz użyć:
  # param_from_get = request.GET.get('param_name')
  # W przypadku Pylons możesz użyć:
  # from pylons import request param_from_get = request.GET.get('param_name')
Instead of checking the transaction status manually, you can simply use the PeP notifications mechanism. Our systems will send you the desired information using POST – there’s no need for you to send any requests.
Here’s an example of how you can check the communication and receive a notification:
Example code
PHP
  // check communication
  if (empty($_POST['communication_id'])) {
      die('Empty communication id');
  }

  // check if token correct
  if ('YOUR_TOKEN' !== $_POST['token']) {
      die('Wrong token');
  }

  foreach ($_POST['content'] as $notification) {
      if ($notification['type'] === 'S') { // sale created
          // transaction completed, do something useful with id_sale
          $id_sale = $notification['id_sale'];
      }
  }

  // return communication_id
  die($_POST['communication_id']);
Ruby
  # check communication
  if params['communication_id'].blank?
      print "Empty communication id"
      exit
  end

  # check if token is correct
  unless 'YOUR_TOKEN' == params['token']
      print "Wrong token"
      exit
  end

  @content = params['content']
  # You can do something useful in Rails view later on

  @content.each do |notification|
      @id_sale = notification['id_sale'] if notification['type'] == 'S'
  end

  # render :text => params['communication_id']
Python
  # check communication
  communication_id = get_request_param('communication_id')
  if not communication_id:
      sys.exit('Empty communication id')

  # check if token correct
  token = get_request_param('token')
  if token != 'YOUR_TOKEN':
      sys.exit('Wrong token')

  #content = get_request_param('content')
  content = [{'type': 'S', 'id_sale': 123456789}]
  for notification in content:
      if notification['type'] == 'S':  # sale created
          # transaction completed, do something useful with id_sale
          id_sale = notification['id_sale']

  # print communication_id


  # Uwaga dot. Pythona:
  # Funkcja get_request_param ma za zadanie pobrać wartości GET. Użyj odpowiednich funkcji oferowanych przez framework, z którego korzystasz, lub napisz własną funkcję.

  # W przypadku Django możesz użyć:
  # param_from_get = request.GET.get('param_name')
  # W przypadku Pylons możesz użyć:
  # from pylons import request param_from_get = request.GET.get('param_name')
Check the transaction status by calling the getSaleInfo.
You can also check whether the transaction was performed successfully by calling the isSuccess method, retrieve additional information or possible error data.
Example code
PHP
  try {
      $status = $client->getSaleInfo(array('id_sale' => $id_sale));
  }
  catch (Exception $e) {
      // handle exceptions here
  }

  if ($client->isSuccess()) {
      if ('CLEARED' === $status['status']) {
          echo "Success, transaction completed, id_sale: {$id_sale}";
      }
  } else {
      die("Error ID: {$status['error']['id_error']}, \n".
          "Error number: {$status['error']['error_number']}, \n".
          "Error description: {$status['error']['error_description']}");
  }
Ruby
  begin
      status = client.get_sale_info({"id_sale" => id_sale})
  rescue PeP::ClientError => e
      # handle exceptions here
  end

  if client.success?
      puts "Success, transaction completed, id_sale: #{id_sale}" if status['status'] == 'CLEARED'
  else
      puts "Error ID: #{status["error"]["id_error"]}, \n"\
          "Error number: #{status["error"]["error_number"]}, \n"\
          "Error description: #{status["error"]["error_description"]}"
      exit
  end
Python
  try:
      status = client.get_sale_info({'id_sale': id_sale})
  except Exception, e:
      # handle exceptions here

  if client.is_success():
      if status['status'] == 'CLEARED':
          print 'Success, transaction completed, id_sale: %s' % id_sale
  else:
      sys.exit('Error ID: ' + str(status["error"]["id_error"]) + '\n' \
              'Error number: ' + str(status["error"]["error_number"]) + '\n' \
              'Error description: ' + str(status["error"]["error_description"]))
Android
  api.saleInfo(idSale, new Callback<SaleInfoResult>() {

      @Override
      public void onFinish(SaleInfoResult result) {
          // success
      }

      @HandleException
      public void onProtocolError(ProtocolException e) {
          // invoke if not success
          // e.getCode() - error code
          // e.getMessage() - error message
      }

      @Override
      public void onError(Exception e) {
          // connection error etc.
      }
  });
iDEAL is a Dutch payment system used exclusively throughout the Netherlands to process payments using direct online bank transfers. Unlike many other national transfer systems, iDEAL provides a unified interface for processing payments in real time while providing a high level of security, and is very popular in the Dutch online market.
Before calling any API methods, please make sure that you have properly initiated the PeP Rest Client as follows:
Example code
PHP
  include_once ('PePRestClient.php');
  $client = new PePRestClient('your_login', 'your_password');
Ruby
  require 'pep_client'
  client = PeP::Client.new('your_login', 'your_password')
Python
  from client import PePRestClient
  client = PePRestClient("your_login", "your_password")
Android
PePApi api = PePClientFactory.createClassicClient(context, "your_login", "your_password");
In order to display the iDeal payment form to your customers, you must first get a list of the available banks that participate in the iDeal program. The ideal_bank_codes method in the REST wrapper was created with this in mind.
First, you must query PeP for the bank list:
Example code
PHP
  try {
    $status = $client->idealBankCodes();
  }
  catch (Exception $e) {
    // handle exception
  }

  if (!$client->isSuccess()) {
    $error_number = $status['error']['error_number'];
    $error_description = $status['error']['error_description'];
    // handle error
  }
Ruby
  begin
    status = client.ideal_bank_codes()
  rescue PeP::ClientError => e
    # handle exception here
  end
Python
  try:
    status = client.ideal_bank_codes()
  except Exception, e:
    # handle exception
    print e
    sys.exit()
Now you can display the payment options to your customer, which will differ based on your programming stack. Here’s a general example:
Example code
PHP
  <select name="bank-code">
    <?php
      foreach ($status['data'] as $bank) {
        echo sprintf('<option value="%s">%s</option>', $bank['bank_code'], $bank['bank_name']), "\n";
      }
    ?>
  </select>
Ruby
  if client.success?
    status['data'].each do |bank|
      # inject the returned bank data into your payment form, example:
      puts '<option value="%s">%s</option>' % [bank['bank_code'], bank['bank_name']]
    end
  else
      puts "Error number: #{status["error"]["error_number"]}, \n"\
          "Error description: #{status["error"]["error_description"]}"
      exit
  end
Python
  if client.is_success():
    for bank in status['data']:
      # inject the returned bank data into your payment form, example:
      print '<option value="%s">%s</option>' % (bank['bank_code'], bank['bank_name'])
  else:
      sys.exit('Error number: ' + str(status["error"]["error_number"]) + '\n' \
              'Error description: ' + str(status["error"]["error_description"]))
After the form is submitted you should follow the documentation of the ideal/sale method, which will allow you to complete the payment process.
Start with preparing information required to perform an iDEAL transaction. Provide sale and customer data, specify the payment type to choose a bank and define a back url – customers will be redirected to this website after submitting the payment.
Example code
PHP
  $params = array(
      'sale' => array(
          'amount'      => 19.99,
          'currency'    => 'EUR',
          'description' => 'Product #1'
      ),
      'customer' => array(
          'name'    => 'John Doe',
          'email'   => 'john@doe.com',
          'ip'      => '127.0.0.1',
          'address' => array (
              'street_house' => '1600 Pennsylvania Avenue Northwest',
              'city'         => 'Washington',
              'state'        => 'DC',
              'zip'          => '500',
              'country_code' => 'US',
          ),
      ),
      'back_url'     => 'http://example-page.com',
      'bank_code'    => 'INGBNL2A',
  );
Ruby
  params = {
      'sale' => {
          'amount'      => 19.99,
          'currency'    => 'EUR',
          'description' => 'Product #1'
      },
      'customer' => {
          'name'    => 'John Doe',
          'email'   => 'john@doe.com',
          'ip'      => '127.0.0.1',
          'address' => {
              'street_house' => '1600 Pennsylvania Avenue Northwest',
              'city'         => 'Washington',
              'state'        => 'DC',
              'zip'          => '500',
              'country_code' => 'US'
          }
      },
      'back_url'  => 'http://example-page.com',
      'bank_code' => 'INGBNL2A'
  }
Python
  params = {
    'sale' : {
      'amount'      : 19.99,
      'currency'    : 'EUR',
      'description' : 'Product #1'
    },
    'customer' : {
      'name'    : 'John Doe'
      'email'   : 'john@doe.com',
      'ip'      : '127.0.0.1',
      'address' : {
        'street_house' : '1600 Pennsylvania Avenue Northwest',
        'city'         : 'Washington',
        'state'        : 'DC',
        'zip'          : '500'
        'country_code' : 'US'
      },
    },
    'back_url'     : 'http://example.com',
    'bank_code'    : 'INGBNL2A'
  }
Simply call the idealSale method. You can also check whether the sale was performed successfully, retrieve the transaction ID or error details, if anything goes wrong.
If the idealSale method was performed successfully, you can now redirect the customer to the bank’s website, where they’ll perform the payment. Use the URL returned by the idealSale.
Example code
PHP
  try
  {
      $status = $client->idealSale($params);
  }
  catch (Exception $e)
  {
      // handle exception
  }

  if ($client->isSuccess()) {
      echo "Success, transaction initiated, id_sale: {$status['id_sale']}, \n
            redirect_url: {$status['redirect_url']} \n";
  } else {
      die("Error ID: {$status['error']['id_error']}, \n".
          "Error number: {$status['error']['error_number']}, \n".
          "Error description: {$status['error']['error_description']}");
  }

  header('Location: ' . $status['redirect_url']);
  die;
Ruby
begin
status = client.ideal_sale(params)
rescue PeP::ClientError => e
# handle exception here
end
if client.success?
puts "Success, transaction initiated, id_sale: #{status["id_sale"]}"\
"redirect_url: #{status["redirect_url"]}"
else
puts "Error ID: #{status["error"]["id_error"]}, \n"\
"Error number: #{status["error"]["error_number"]}, \n"\
"Error description: #{status["error"]["error_description"]}"
exit
end
# redirect to url in status['redirect_url']
exit
Python
try:
status = client.ideal_sale(params)
except Exception, e:
# handle exception
print e
sys.exit()
if client.is_success():
print 'Success, transaction initiated, id_sale: %s, redirect_url: %s' % \
(status['id_sale'], status['redirect_url'])
else:
sys.exit('Error ID: ' + str(status["error"]["id_error"]) + '\n' \
'Error number: ' + str(status["error"]["error_number"]) + '\n' \
'Error description: ' + str(status["error"]["error_description"]))
# redirect to url in status['redirect_url']
sys.exit()
# Uwaga dot. Pythona:
# W Pythonie nie ma natywnej funkcji służącej do przekierowania na inną stronę – musisz albo skorzystać z funkcji oferowanych przez framework, z którego korzystasz, albo napisać własną funkcję.
# W przypadku Django możesz użyć:
# from django.http import HttpResponseRedirect
# HttpResponseRedirect('http://example.com/')
# W przypadku Pylons możesz użyć:
# from pylons.controllers.util import redirectredirect('http://example.com/')
After submitting the payment on the bank’s website, the customer will be redirected back to your site (the back_url, to be precise). You should now verify the returned information to avoid any fraud attempts and check the transaction’s status.
Example code
PHP
$salt = 'YOUR_HASH_SALT';
$status = $_GET['status'];
$description = $_GET['description'];
$amount = $_GET['amount'];
$currency = $_GET['currency'];
$hash = $_GET['hash'];
$id = '';
if ($status !== 'ERROR') // success, get id_sale
$id = $_GET['id_sale'];
$calc_hash = sha1("{$salt}|{$status}|{$description}|{$amount}|{$currency}|{$id}");
// check hash salt
if ( $calc_hash !== $hash ) {
die ("Error, wrong hash");
}
// check transaction status
switch ($status) {
case 'ERROR':
die("Error, transaction declined, {$_GET['error_description']}");
break;
case 'CLEARED':
echo "Success, transaction completed, id_sale: {$_GET['id_sale']}";
break;
default:
/* transaction pending:
* check status regularly using the saleStatus method
* or wait for notification */
echo "Transaction pending";
break;
}
Ruby
# Simple controller action code in Rails
# it's just an example - most of the logic should be moved to model
salt = 'YOUR_HASH_SALT'
status = params['status']
description = params['description']
amount = params['amount']
currency = params['currency']
hash = params['hash']
id = ''
unless status == 'ERROR'
id = params['id_sale']
else
# redirect to an index action to correct the payment + simple notice
# for rails: redirect_to :index, :notice => "Error, transaction declined, #{description}"
end
calc_hash = Digest::SHA1.hexdigest("#{salt}|#{status}|#{description}|#{amount}|#{currency}|#{id}")
unless calc_hash == hash
# redirect to an index action to correct the payment
# for rails: redirect_to :index
end
# check transaction status
case status
when 'ERROR'
# redirect to an index action to correct the payment + simple notice
# for rails: redirect_to :index, :notice => "Error, transaction declined, #{response["error"]["error_description"]}"
when 'CLEARED'
# redirect to an index action to correct the payment + simple notice
# for rails: redirect_to :index, :notice => "Success, transaction completed, id_sale: #{id}"
else
# redirect to an index action to correct the payment + simple notice
# for rails: redirect_to :index, :notice => "Transaction pending"
end
Python
salt = 'YOUR_HASH_SALT'
status = get_request_param('status')
description = get_request_param('description')
amount = get_request_param('amount')
currency = get_request_param('currency')
hash = get_request_param('hash')
id_sale = None
# success, get id_sale
if status != 'ERROR':
id_sale = get_request_param('id_sale')
calc_hash = hashlib.sha1(
'|'.join([salt, status, description, amount, currency, id_sale])).hexdigest()
# check hash salt
if calc_hash != hash:
sys.exit('Error, wrong hash')
# check transaction status
if status == 'ERROR':
sys.exit('Error, transaction declined, %s' % \
get_request_param('error_description'))
elif status == 'CLEARED':
print 'Success, transaction completed, id_sale: %s' % id_sale
else:
# transaction pending: check status regularly using the saleStatus
# method or wait for notification
print 'Transaction pending'
# Python note:
# The get_request_param function is supposed to collect data from GET params. Depending on your framework or any other toolkit, please use a proper function or write one that suits you best.
# For Django, you can use:
# param_from_get = request.GET.get('param_name')
# For Pylons, you can use:
# from pylons import requestparam_from_get = request.GET.get('param_name')
Check the transaction status by calling the get_sale_info.
You can also check whether the transaction was performed successfully by calling the is_success method, retrieve additional information or possible error data.
Example code
PHP
try {
$status = $client->getSaleInfo(array('id_sale' => $id_sale));
}
catch (Exception $e) {
// handle exceptions here
}
if ($client->isSuccess()) {
if ('CLEARED' === $status['status']) {
echo "Success, transaction completed, id_sale: {$id_sale}";
}
} else {
die("Error ID: {$status['error']['id_error']}, \n".
"Error number: {$status['error']['error_number']}, \n".
"Error description: {$status['error']['error_description']}");
}
Ruby
begin
status = client.get_sale_info({"id_sale" => id_sale})
rescue PeP::ClientError => e
# handle exceptions here
end
if client.success?
puts "Success, transaction completed, id_sale: #{id_sale}" if status['status'] == 'CLEARED'
else
puts "Error ID: #{status["error"]["id_error"]}, \n"\
"Error number: #{status["error"]["error_number"]}, \n"\
"Error description: #{status["error"]["error_description"]}"
exit
end
Python
try:
status = client.get_sale_info({'id_sale': id_sale})
except Exception, e:
# handle exceptions here
if client.is_success():
if status['status'] == 'CLEARED':
print 'Success, transaction completed, id_sale: %s' % id_sale
else:
sys.exit('Error ID: ' + str(status["error"]["id_error"]) + '\n' \
'Error number: ' + str(status["error"]["error_number"]) + '\n' \
'Error description: ' + str(status["error"]["error_description"]))
Android
api.saleInfo(idSale, new Callback<SaleInfoResult>() {
@Override
public void onFinish(SaleInfoResult result) {
// success
}
@HandleException
public void onProtocolError(ProtocolException e) {
// invoke if not success
// e.getCode() - error code
// e.getMessage() - error message
}
@Override
public void onError(Exception e) {
// connection error etc.
}
});
Instead of checking the transaction status manually, you can simply use the PeP notifications mechanism.
Our systems will send you the desired information using POST – there’s no need for you to send any requests.
Here’s an example of how you can check the communication and receive a notification:
Example code
PHP
// check communication
if (empty($_POST['communication_id'])) {
die('Empty communication id');
}
// check if token correct
if ('YOUR_TOKEN' !== $_POST['token']) {
die('Wrong token');
}
foreach ($_POST['content'] as $notification) {
if ($notification['type'] === 'S') { // sale created
// transaction completed, do something useful with id_sale
$id_sale = $notification['id_sale'];
}
}
// return communication_id
die($_POST['communication_id']);
Ruby
# check communication
if params['communication_id'].blank?
print "Empty communication id"
exit
end
# check if token is correct
unless 'YOUR_TOKEN' == params['token']
print "Wrong token"
exit
end
@content = params['content']
# You can do something useful in Rails view later on
@content.each do |notification|
@id_sale = notification['id_sale'] if notification['type'] == 'S'
end
# render :text => params['communication_id']
Python
# check communication
communication_id = get_request_param('communication_id')
if not communication_id:
sys.exit('Empty communication id')
# check if token correct
token = get_request_param('token')
if token != 'YOUR_TOKEN':
sys.exit('Wrong token')
#content = get_request_param('content')
content = [{'type': 'S', 'id_sale': 123456789}]
for notification in content:
if notification['type'] == 'S': # sale created
# transaction completed, do something useful with id_sale
id_sale = notification['id_sale']
# print communication_id
# Python note:
# The get_request_param function is supposed to collect data from GET params. Depending on your framework or any other toolkit, please use a proper function or write one that suits you best.
# For Django, you can use:
# param_from_get = request.GET.get('param_name')
# For Pylons, you can use:
# from pylons import request
# param_from_get = request.GET.get('param_name')
There is a couple of things you should know to integrate with PeP to make the whole thing easier and even more comfortable.
First of all, you should always use a test account. Every account created via the PeP website is a test account, so no worries here. What’s important, no money will be ever charged, refunded or processed in any other way if you use a test account. You’re completely safe, even if you happen to make a mistake.
Whenever you want to perform any operation regarding PeP’s API, make sure you have included and started the PeP Rest Client (remember to provide your user name and password). It’s very simple and can be done as follows:
Example code
PHP
include_once ('PePRestClient.php');
$client = new PePRestClient('your_login', 'your_password');
Ruby
require 'pep_client'
client = PeP::Client.new('your_login', 'your_password')
Python
from client import PePRestClient
client = PePRestClient("your_login", "your_password")
It’s actually very simple – just enter the desired error code as the transaction amount.
You can find all error codes in the error codes section.
To test your payment forms, you will obviously need a proper set of card data. There’s no need for you to use your own card for that. Although no money will be processed with a test account, you will most likely want to perform tests that simulate certain situations, for example different brands of credit cards. Here’s a table with a set of test credit card numbers that can be used for simulations.
You can also trigger a transaction error (for testing purposes) by entering an error code as transaction amount.
Common sale tests
| Number | Vendor | Notes/purpose |
|---|---|---|
| 4111111111111111 | Visa | Sale successful. |
| 4200000000000000 | Visa | Sale successful. |
| 5500000000000004 | MasterCard | Sale successful. |
| 370000000000002 | American Express | Sale successful. |
| 586824160825533338 | Maestro International | Sale successful. |
Codes
| Number | Vendor | Notes/purpose |
|---|---|---|
| 4000000000000069 | Visa | 3-D Secure authentication is required.(sale error 700) |
| 4012001036275556 | Visa | Unable to verify card enrollment (enrollment check error 720) |
| 4012001038488884 | Visa | Unable to verify card enrollment (enrollment check error 720) |
| 4012001036298889 | Visa | Unable to verify card enrollment (enrollment check error 720) |
| 4012001038443335 | Visa | 3-D Secure Enrollment testing – card not enrolled in 3-D Secure |
| 4012001036853337 | Visa | Card enrolled, verification failed (sale error 703) |
| 4012001036983332 | Visa | Card enrolled, verification failed (sale error 703) |
| 4012001037490006 | Visa | Card enrolled, verification failed (sale error 703) |
| 4012001037461114 | Visa | Card enrolled, authentication failure (sale error 704) |
| 4012001037484447 | Visa | Card enrolled, authentication not available (sale error 725) |
Codes
| Number | Vendor | Notes/purpose |
|---|---|---|
| 4055018123456780 | Visa | AVS result “X” (exact match) |
| 4055019123456788 | Visa | AVS result “Y” (exact match) |
| 4055010123456787 | Visa | AVS result “A” (ZIP mismatch) |
| 4055017123456782 | Visa | AVS result “W” (street mismatch) |
| 4055020123456786 | Visa | AVS result “Z” (street mismatch) |
| 4055013123456781 | Visa | AVS result “N” (ZIP and street mismatch) |
| 4055011123456785 | Visa | AVS result “E” (logical error/AVS not supported) |
| 4055012123456783 | Visa | AVS result “G” (logical error/AVS not supported) |
| 4055015123456786 | Visa | AVS result “S” (logical error/AVS not supported) |
| 4055016123456784 | Visa | AVS result “U” (logical error/AVS not supported) |
| 4055014123456789 | Visa | AVS result “R” (technical error/issuer not available) |
If you want to trigger a specific error when integrating with PeP systems (using a test account), simply enter a desired error code as the transaction amount.
Codes
| Error code | Error message |
|---|---|
| 302 | Direct debit is not accessible for this country [account_country_code]. |
| 303 | Direct debit declined. |
| 312 | Account holder name is not valid. |
| 313 | Customer name is not valid. |
| 314 | Customer e-mail is not valid. |
| 315 | Customer address (street and house) is not valid. |
| 316 | Customer city is not valid. |
| 317 | Customer zip code is not valid. |
| 318 | Customer state is not valid. |
| 319 | Customer country is not valid. |
| 320 | Amount is not valid. |
| 321 | Amount is too low. |
| 322 | Currency code is not valid. |
| 323 | Customer IP address is not valid. |
| 324 | Description is not valid. |
| 325 | Account country is not valid. |
| 326 | Bank code (SWIFT/BIC/BLZ) is not valid. |
| 327 | Account number is not valid. |
| 401 | Multiple same transactions lock triggered. Wait [number of seconds] s and try again. |
| 402 | Payment gateway problem. Please try again later. |
| 403 | Card declined. |
| 404 | Transaction in this currency [currency code] is not allowed. |
| 405 | Unknown payment method or method not set. |
| 406 | More than one payment method provided. Only one payment method is allowed. |
| 407 | Capture later not possible with this payment method. |
| 408 | Feature [feature] not available for this payment method. |
| 409 | Overriding default [feature] not allowed for this merchant account. |
| 410 | Unsupported payment method. |
| 411 | Card number format is not valid. |
| 412 | Card expiration year is not valid. |
| 413 | Card expiration month is not valid. |
| 414 | Card expiration year in the past. |
| 415 | Card has expired. |
| 416 | Card code (CVV2/CVC2/CID) format is not valid. |
| 417 | Name on card is not valid. |
| 418 | Cardholder name is not valid. |
| 419 | Cardholder e-mail is not valid. |
| 420 | Cardholder address (street and house) is not valid. |
| 421 | Cardholder city is not valid. |
| 422 | Cardholder zip is not valid. |
| 423 | Cardholder state is not valid. |
| 424 | Cardholder country is not valid |
| 425 | Amount is not valid. |
| 426 | Amount is too low. |
| 427 | Currency code is not valid. |
| 428 | Client IP is not valid. |
| 429 | Description is not valid. |
| 430 | Unknown card type or card number invalid. |
| 431 | Card issue number is not valid. |
| 432 | Fraud check on is not valid. |
| 433 | AVS level is not valid. |
| 441 | Sale Authorization ID is not valid. |
| 442 | Sale Authorization ID not found or the authorization has been closed. |
| 443 | Capture sale amount greater than the authorization amount. |
| 470 | Resale without card code is not allowed for this merchant account. |
| 471 | Sale ID is not valid. |
| 472 | Resale amount is not valid. |
| 473 | Amount is too low |
| 474 | Resale currency code is not valid. |
| 475 | Resale description is not valid. |
| 476 | Sale ID not found. |
| 477 | Cannot resale. Chargeback assigned to Sale ID. |
| 478 | Cannot resale this sale. |
| 479 | Card has expired. |
| 480 | Cannot resale. Reversal assigned to Sale ID. |
| 481 | Sale ID is not valid. |
| 482 | Refund amount is not valid. |
| 483 | Refund reason is not valid. |
| 484 | Sale ID not found. |
| 485 | Cannot refund. Chargeback assigned to Sale ID. |
| 486 | Cannot refund. Exceeded available refund amount. |
| 487 | Cannot refund. Sale is already completely refunded. |
| 488 | Cannot refund this sale. |
| 491 | Sale ID list is not set or empty |
| 492 | Sale ID list is too large (more than 100). |
| 493 | Sale ID [sale_id] at position [number] is not valid. |
| 501 | Internal server error. Please try again later. |
| 502 | Payment gateway error. Please try again later. |
| 503 | Payment method [payment_method_name] not allowed for this merchant account. |
| 505 | This merchant account is inactive. |
| 601 | Fraud attempt detected. Score is: [score] (range is 0-100). |
| 611 | Blacklisted account number found. |
| 612 | Blacklisted card country found. |
| 613 | Blacklisted card number found. |
| 614 | Blacklisted customer country found. |
| 615 | Blacklisted customer email found. |
| 616 | Blacklisted customer IP address found. |
| 700 | 3-D Secure authentication is required. |
| 701 | 3-D Secure authentication server error. Please try again later or use card not enrolled in 3-D Secure. |
| 702 | 3-D Secure authentication server problem. Please try again later or use card not enrolled in 3-D Secure. |
| 703 | 3-D Secure authentication failed. Credit card cannot be accepted for payment. |
| 704 | 3-D Secure authentication failed. Card declined |
| 711 | Card number format is not valid. |
| 712 | Card expiration year is not valid. |
| 713 | Card expiration month is not valid. |
| 714 | Card has expired. |
| 715 | Amount is not valid. |
| 716 | Currency code is not valid. |
| 717 | Back URL is not valid. |
| 718 | Unknown card type or card number invalid. |
| 719 | Card issue number is not valid. |
| 720 | Unable to verify enrollment for 3-D Secure. You can perform a normal payment without 3-D Secure or decline the transaction. |
| 731 | Completed authentication with this Secure3d ID not found. |
| 732 | Sale and 3-D Secure card numbers are different. |
| 733 | Sale and 3-D Secure card expiration years are different. |
| 734 | Sale and 3-D Secure card expiration months are different. |
| 735 | Sale and 3-D Secure amounts are different. |
| 736 | Sale and 3-D Secure currency codes are different. |
| 737 | Sale with ID [id_sale] was performed for this Secure3d ID. |
| 780 | Service fee amount not set. |
| 781 | Sub-merchant ID not set. |
| 782 | Company cannot process sub-merchant transactions. |
| 783 | Invalid sub-merchant ID. |
| 784 | Sub-merchant is disabled. |
| 785 | Service fee amount is too low. |
| 786 | Invalid service fee amount. |
| 787 | Sub-merchant ID mismatch. |
Codes
| Code | Message |
|---|---|
| A | Street address matches, but 5-digit and 9-digit postal codes do not match. |
| B | Street address matches, but postal code not verified. |
| C | Street address and postal code do not match. |
| D | Street address and postal code match. |
| E | AVS data is invalid or AVS is not allowed for this card type. |
| F | Card member’s name does not match, but billing postal code matches. |
| G | Non-U.S. issuing bank does not support AVS. |
| H | Card member’s name does not match. Street address and postal code match. |
| I | Address not verified. |
| J | Card member’s name, billing address, and postal code match. |
| K | Card member’s name matches but billing address and billing postal code do not match. |
| L | Card member’s name and billing postal code match, but billing address does not match. |
| M | Street address and postal code match. |
| N | Street address and postal code do not match. |
| O | Card member’s name and billing address match, but billing postal code does not match. |
| P | Postal code matches, but street address not verified. |
| Q | Card member’s name, billing address, and postal code match. |
| R | System unavailable. |
| S | Bank does not support AVS. |
| T | Card member’s name does not match, but street address matches. |
| U | Address information unavailable. Returned if the U.S. bank does not support non-U.S. AVS or if the AVS in a U.S. bank is notfunctioning properly. |
| V | Card member’s name, billing address, and billing postal code match. |
| W | Street address does not match, but 9-digit postal code matches. |
| X | Street address and 9-digit postal code match. |
| Y | Street address and 5-digit postal code match |
| Z | Street address does not match, but 5-digit postal code matches. |
Transaction Notifications is a service that simplifies automatic communication between your systems and PeP.
The idea behind it is this: you or your customers may initiate many payment operations (sales, refunds etc.), but there are cases, when you simply need to check their statuses (i.e. whether a payment was cleared). There is also a number of operations that are performed without your input (i.e. chargebacks or reversals).
Thanks to Transaction Notifications you don’t have to control and check transactions manually in the Merchant Panel or wait for email notifications from PeP.
In order to have Transaction Notifications enabled or disabled for specific accounts, please contact our support.
Notifications are sent in packages of no more than 100 transactions. Packages are created and sent either instantly or in 5-minute intervals (this depends on the payment method). If a package is not sent successfully, the system will try to send it again every 5 minutes and after an hour – every hour.
If a package fails to be received by your system during a specified period of time (two days), additional information will be sent to PeP Support. Your staff will be queried about the problem with receiving notifications and helped in resolving it if necessary.
For test accounts, notifications are sent only once.
Notifications are sent using HTTP POST.
In order to receive notifications, you need to write a script that will be able to receive POST data and return a response with specific content. The script must be accessible by one of the following protocols:
- HTTP,
- HTTPS.
Request structure
| Name | Type | Description |
|---|---|---|
| content | array | Notification content (array of notification data arrays). |
| content_size | integer | Size of the content array – number of notifications in package. |
| communication_id | string(30) | Unique string identifying the notifications package. |
| token string(50) | Optional. | Static string sent only if configured for merchant account. |
The content array contains arrays that represent specific notifications.
Cntent structure
| Name | Type | Description |
|---|---|---|
| type | string(6) | Transaction type. You can find the full list on the Transaction types page. |
| id | integer(10) Optional. | Filled only if notification is about other transaction type than sale (see type field). Accordingly, id field may represent id_refund, id_chargeback etc. |
| id_sale | integer(10) | PeP Online sale ID number. If notification is about other transaction type than sale, this id points to related sale transaction. |
| date | string(10) | Transaction date, YYYY-MM-DD format. |
| amount | decimal(12,2) | Transaction amount (depending on the case: sale amount, refund amount etc.). |
| currency_code | string(3) | Transaction currency code. |
| text | string(200) UTF-8 encoded Optional. | Transaction description. Accordingly, it may be sale description, refund reason, chargeback reason etc. |
Represented as PHP array
PHP
Array
(
[content] => Array
(
[0] => Array
(
[type] => S
[id_sale] => 123
[date] => 2012-05-29
[amount] => 12.34
[currency_code] => EUR
[text] => Product #1
)
[1] => Array
(
[type] => R
[id_sale] => 123
[id] => 99
[date] => 2012-05-30
[amount] => 12.34
[currency_code] => EUR
[text] => Money back guarantee
)
)
[content_size] => 2
[communication_id] => 2012-05-30 10:41:36 0002 00933
[token] => token
)
The script is expected to respond with a HTTP response 200 (OK). Response content should contain only communication_id of received notifications package. Anything else or empty page will be interpreted as failure.
Example code
PHP
$user = "user";
$password = "password";
// check HTTP Basic authentication data
if (!isset($_SERVER['PHP_AUTH_USER']) || !isset($_SERVER['PHP_AUTH_PW'])
|| $user != $_SERVER['PHP_AUTH_USER'] || $password != $_SERVER['PHP_AUTH_PW']) {
// authentication failed
header("WWW-Authenticate: Basic realm=\"Secure Area\"");
header("HTTP/1.0 401 Unauthorized");
exit();
}
// check communication
if (empty($_POST['communication_id'])) {
die('Empty communication id');
}
// check if token correct
if ('YOUR_TOKEN' !== $_POST['token']) {
die('Wrong token');
}
foreach ($_POST['content'] as $notification) {
if ($notification['type'] === 'S') { // sale created
// transaction completed, do something useful with id_sale
$id_sale = $notification['id_sale'];
}
}
// return communication_id
die($_POST['communication_id']);
| Type | Description |
|---|---|
| SA | Sale authorization. Only for card transactions in auth+capture model. Capture is indicated with “S” type notification. Associated with Sale Authorization ID in PeP Online system. |
| S | Sale. Either card or Direct Debit. Associated with Sale ID in PeP Online system. |
| R | Refund. Multiple refunds for single sale may be performed. Associated with Refund ID in PeP Online system. |
| RV | Reversal. Direct Debit transactions-specific. Sale was reversed e.g. because funds were not available on charged account. |
| RRO | Retrieval Request Open. Card transactions-specific. Request from bank for additional documents (sale proof). Unanswered retrieval requests in most cases result in chargeback being issued by the bank. |
| RRA | Retrieval Request Answer. Indicates that answer for retrieval request was sent (either using Merchant Panel or through PeP Online Support). |
| RRC | Retrieval Request Closed. End of retrieval request procedure. |
| CB1O | Chargeback 1 Open. Card transaction-specific. First chargeback was issued. Associated with Chargeback ID in PeP Online system. |
| CB1RR | Chargeback 1 Reject Request. Indicates that request for chargeback rejection was sent. Requests may be sent using Merchant Panel or through PeP Online Support (must be accompanied with sale proof documents). |
| CB1RF | Chargeback 1 Reject Fulfilled. Sent documents were accepted by the bank and chargeback was successfully rejected. |
| CB1RRC | Chargeback 1 Reject Request Cancellation. Chargeback rejection (CB1RF) was issued due to technical error and is cancelled. |
| CB1R | Chargeback 1 Reversal. Chargeback (CB1O) was issued due to technical error and is reversed. |
| CB1C | Chargeback 1 Closed. Chargeback procedure is closed (chargeback expires). Closed chargebacks cannot be contested. |
| CB2O | Chargeback 2 Open. Second chargeback. May be issued only if first chargeback procedure is closed and first chargeback was successfully rejected. Procedure is similar to first chargeback. Associated with Chargeback ID in PeP Online system. |
| CB2RR | Chargeback 2 Reject Request. See CB1RR. |
| CB2RF | Chargeback 2 Reject Fulfilled. See CB1RF. |
| CB2RRC | Chargeback 2 Reject Request Cancellation. See CB1RRC. |
| CB2R | Chargeback 2 Reversal. See CB1R. |
| CB2C | Chargeback 2 Closed. See CB1C. Closing second chargeback ends whole chargeback procedure. |
| CAD | Compliance Arbitration Debit. Arbitration resulted in money returned to client. Treated similarly to chargeback in PeP Online system and associated with Chargeback ID. |
| CAC | Compliance Arbitration Credit. Issued after CAD. Arbitration resulted in money returned to merchant. Treated similarly to successful chargeback rejection in PeP Online system. |
| PAO | Pre-Arbitration or Pre-Compliance Open. Marks request for an arbitration which takes place before credit card company arbitral court. Such disputes can be initiated by merchant request in some especially difficult cases. |
| PAA | Pre-Arbitration or Pre-Compliance Answer. Answer to previously made request for arbitration. |
| PAC | Pre-Arbitration or Pre-Compliance Closed. End of Pre-Arbitration or Pre-Compliance phase. |
| AO | Arbitration Open. Announces start of arbitration before credit card company court. Only if request for arbitration was accepted. |
| EOR | End of Ruling. Closing of arbitral court hearing. |
| OD | Objection Declined. Sent after RRA, CB1RR or CB2RR. Indicates that sent documents (for Retrieval Request or Chargeback Rejection) were not accepted. For retrieval request it usually means that chargeback will be issued, for chargebacks it means that chargeback stands. |
| C | Cancellation. Notification from credit card issuer to merchant that no debit entries from the credit card in question will be accepted in the future. |
Integrating with PeP systems allows you to implement a solution that will fit your business characteristics and even increase your income. You can even design your very own model and use our API to accept payments in a manner that suits you best. Here are a few examples of popular payment mechanism – perhaps one of them is what your need (or will inspire you somehow).
This is actually the most common way of purchasing goods online. Each and every transaction is initiated by a customer, and so is the payment.
Regular shopping is quite all right, but it’s often a bit enhanced. For example, online shops create accounts for their customers. This way when a customer returns, they don’t have to enter their delivery address again – it’s already saved there.
But why not do the same with payment information? Of course that’s a lot more sensitive data. However, if you don’t want to go through all the security issues, PeP can store card data for you (and it’s free!). You can just operate with specific ID numbers that will correspond with records in our databases, but there will be no actual data on your side, hence no need to create additional security layers.
Think about it this way – you have the customer’s address saved on your servers and you have access to card data stored on our servers. That’s all you need to process a payment and it’s up to you how the payment will be initiated by your customer. Design the model that fits your business best. Owing to this feature, you can upgrade or downgrade your SaaS, you can make your customers come back to you more often – they can just log in once and their data will be remembered, so they wouldn`t have to fill in the long and boring payment forms.
Recurring payments are a solution commonly used with all kinds of subscriptions. It goes along great with magazines, online services (monthly/annual fees for pro accounts) and so on.
A customer must provide their card data and allow you to collect money from their account. This is often done within the first sale – every next payment is done automatically and refers to the first sale. This way the first purchase is a kind of key that gives you access to the customer’s card.

So the common path here is that a customer buys something for the first time, e.g. first number of an e-zine or first month of a pro account in you web service. That’s the first sale that will allow you to collect money automatically for next issues/months.
Sometimes you don’t want to collect money right away and that’s why there’s an alternative to the solution mentioned above. You don’t have to actually process the payment from the first sale to be able to collect money automatically. All you need is an authorization of the customer’s card. Of course the card data must still be provided, so in many cases it may seem not different at all (well, except for the fact, that no money is actually collected). But there are certain models that make such solutions quite reasonable. Think of it as of paid access to some materials or subscriptions for daily/weekly magazines. You give a week or two to look around, a test trial. If a customer does not resign until then, you start charging them. What’s more, if you offer multiple subscriptions like this and you already have the customer’s information. The customer chooses and gets a free trial; if they don’t resign, they start paying without the necessity of logging in or providing any data once more.

Tokenization allows transactions to be made using a token_id after prior tokenization of a payment card. It is only available on selected merchant accounts where this service has been activated. You can use it to make payments with Visa and MasterCard cards.
In case of tokenization, the endpoint address for secure form changes from https://secure.pep.pl/order/cart.html to https://secure.pep.pl/order.html
When considering tokenization, specific data must be provided for the secure form. The transaction_type must be set to "T," and there are additional requirements for the following fields:
| POST field name | Format | Required | Description |
|---|---|---|---|
| customer_id | string(12) - only numeric characters | yes | Customer ID in the merchant system. |
| description | string(1-255) | Yes | Only letters and numbers are allowed. Transaction identifier that will be passed to PeP systems. This will be later visible as the transaction’s description in PeP’s Merchant Panel. |
| amount | decimal(12,2) | Yes | Use dot (.) as decimal separator. Total amount to be charged. |
| currency | string(3) | Yes | ISO 4217 currency code; the specified amount will be charged in this currency (for example “EUR” or “GBP”). |
| hash_type | string(8) | No | SHA256 |
POST cards / sale
Metoda cards/sale umożliwia przeprowadzenie pojedynczej płatności z użyciem karty (kredytowej, debetowej, przedpłaconej itd.). Uwzględnia dodatkowe mechanizmy bezpieczeństwa, takie jak AVS czy fraud check.
Request Body schema: application/json
Query structure
required | object (Sale) A structure containing sale information. |
required | object (Customer) A structure containing customer data. |
required | object (Card) A structure containing card information |
Responses
Request samples
- Payload
{- "sale": {
- "amount": "100.00",
- "currency": "EUR",
- "description": "TR001",
- "fraud_check_on": true,
- "avs_check_level": 2,
- "id_sub_merchant": 3128,
- "service_fee_amount": 0.3
}, - "customer": {
- "name": "John Doe",
- "email": "john@doe.com",
- "ip": "123.456.78.90",
- "address": {
- "street_house": "1600 Pennsylvania Avenue Northwest",
- "city": "Washington",
- "state": "DC",
- "zip": "20500",
- "country_code": "US"
}
}, - "card": {
- "card_number": "4111111111111111",
- "expiration_month": "03",
- "expiration_year": "2017",
- "name_on_card": "John Doe",
- "card_code": "123"
}
}POST cards / saleByToken
Metoda cards/saleByToken umożliwia przeprowadzenie pojedynczej płatności z użyciem karty (kredytowej, debetowej, przedpłaconej itd.). Uwzględnia dodatkowe mechanizmy bezpieczeństwa, takie jak AVS czy fraud check.
Request Body schema: application/json
Query structure
required | object (Sale) A structure containing sale information. |
required | object (Customer) A structure containing customer data. |
required | object (Token) A structure containing card information |
Responses
Request samples
- Payload
{- "sale": {
- "amount": "100.00",
- "currency": "EUR",
- "description": "TR001",
- "fraud_check_on": true,
- "avs_check_level": 2,
- "id_sub_merchant": 3128,
- "service_fee_amount": 0.3
}, - "customer": {
- "name": "John Doe",
- "email": "john@doe.com",
- "ip": "123.456.78.90",
- "address": {
- "street_house": "1600 Pennsylvania Avenue Northwest",
- "city": "Washington",
- "state": "DC",
- "zip": "20500",
- "country_code": "US"
}
}, - "card": {
- "token": "12a34b45c67d89e00f1aa2bb3cc4dd5ee6ff12a34b45c67d89e00f1aa2bb3cc4"
}
}POST cards / generateToken
Metoda cards/generateToken tworzy tymczasowy, unikalny token dla podanego zestawu danych karty. Token jest ważny przez 15 minut od utworzenia.
Request Body schema: application/json
Query structure
| public_api_key required | string <40 characters> Your Public API Key. |
| card_number required | string <13-19 digits> The full number of the card without any whitespaces. Only digits are allowed. |
| expiration_month required | string <2 digits, 01…12> Expiration month. 01 to 12. |
| expiration_year required | string <4 digits> Expiration year as on the card. |
| name_on_card required | string <2-50 characters, UTF-8 encoded> Cardholder name as written on the card. |
| card_code required | string <3-4 digits> Depending on the type of the card this will be either CVV2 (Visa), CVC2 (MasterCard) or CID (American Express) |
Responses
Request samples
- Payload
{- "public_api_key": "71426338751d8c8e454a13fa4c44a3094cbab89c",
- "card_number": "4111111111111111",
- "expiration_month": "2017",
- "expiration_year": "71426338751d8c8e454a13fa4c44a3094cbab89c",
- "name_on_card": "John Doe",
- "card_code": "123"
}POST cards / check
Metoda cards/check sprawdza, czy podany numer karty jest prawidłowy oraz rozpoznaje wystawcę karty.
Request Body schema: application/json
Query structure
| card_number required | string <13-19 digits> The full number of the card without any whitespaces. Only digits are allowed. |
Responses
Request samples
- Payload
{- "card_number": "4200000000000000"
}POST cards / checkByToken
Metoda cards/checkByToken sprawdza, czy podany numer karty jest prawidłowy oraz rozpoznaje wystawcę karty.
Request Body schema: application/json
Query structure
| token required | string <64 chars> A unique string that identifies a specific card. It’s generated by PeP when making a payment and remains active for 15 minutes. |
Responses
Request samples
- Payload
{- "token": "12a34b45c67d89e00f1aa2bb3cc4dd5ee6ff12a34b45c67d89e00f1aa2bb3cc4"
}POST paypal / sale
Metoda paypal/sale umożliwia przeprowadzenie płatności z użyciem konta PayPal.
Request Body schema: application/json
Query structure
required | object (SaleForPayPal) A structure containing sale information. |
| back_url required | string <10-255 characters, UTF-8 encoded> Website address where a customer will be redirected after performing the payment. |
object (Recurring) A structure containing recurring profile information. |
Responses
Request samples
- Payload
{- "sale": {
- "amount": "100.00",
- "currency": "EUR",
- "description": "TR001"
}, - "recurring": {
- "amount": "100.00",
- "start_date": "2022-01-01",
- "period": "day"
}
}POST paypal / stopRecurring
Metoda paypal/stopRecurring umożliwia zatrzymanie aktywnego profilu recurringowego PayPala.
Request Body schema: application/json
Query structure
| id_paypal_recurring required | integer <unsigned long> Identification number of recurring profile. |
Responses
Request samples
- Payload
{- "id_paypal_recurring": 1
}POST banktransfers / sale
Metoda banktransfers/sale umożliwia przeprowadzenie płatności z wykorzystaniem przelewu bankowego.
Request Body schema: application/json
Query structure
required | object (Sale) A structure containing sale information. |
required | object (Customer) A structure containing customer data. |
| back_url required | string <10-255 characters, UTF-8 encoded> Website address where a customer will be redirected after performing the payment. |
| payment_type required | string <2-4 characters> Enum: "AB" "AS" "MT" "IN" "IP" "MI" "CA" "PP" "PCZ" "IB" "PO" "GB" "IG" "WB" "PB" "CT" "PL" "NP" "BS" "NB" "RF" "PBS" "SGB" "BLIK" "OH" Bank code:
|
Responses
Request samples
- Payload
{- "sale": {
- "amount": "100.00",
- "currency": "EUR",
- "description": "TR001",
- "fraud_check_on": true,
- "avs_check_level": 2,
- "id_sub_merchant": 3128,
- "service_fee_amount": 0.3
}, - "customer": {
- "name": "John Doe",
- "email": "john@doe.com",
- "ip": "123.456.78.90",
- "address": {
- "street_house": "1600 Pennsylvania Avenue Northwest",
- "city": "Washington",
- "state": "DC",
- "zip": "20500",
- "country_code": "US"
}
},
}POST directdebits / sale
Metoda directdebits/sale umożliwia przeprowadznei płatności Direct Debit.
Request Body schema: application/json
Query structure
required | object (Sale) A structure containing sale information. |
required | object (Customer) A structure containing customer data. |
required | object (Account) A structure containing account data. |
Responses
Request samples
- Payload
{- "sale": {
- "amount": "100.00",
- "currency": "EUR",
- "description": "TR001",
- "fraud_check_on": true,
- "avs_check_level": 2,
- "id_sub_merchant": 3128,
- "service_fee_amount": 0.3
}, - "customer": {
- "name": "John Doe",
- "email": "john@doe.com",
- "ip": "123.456.78.90",
- "address": {
- "street_house": "1600 Pennsylvania Avenue Northwest",
- "city": "Washington",
- "state": "DC",
- "zip": "20500",
- "country_code": "US"
}
}, - "account": {
- "iban": "DE12345678901234567890",
- "bic": "BICBICDE",
- "account_holder": "John Doe",
- "account_country": "DE",
- "mandate_id": "54321"
}
}POST sofort / sale
Metoda sofort/sale umożliwia przeprowadzenie płatności w wykorzystaniem systemu SOFORT Banking.
Request Body schema: application/json
Query structure
required | object (Sale) A structure containing sale information. |
required | object (Customer) A structure containing customer data. |
| back_url required | string <10-255 characters, UTF-8 encoded> Website address where a customer will be redirected after performing the payment. |
Responses
Request samples
- Payload
{- "sale": {
- "amount": "100.00",
- "currency": "EUR",
- "description": "TR001",
- "fraud_check_on": true,
- "avs_check_level": 2,
- "id_sub_merchant": 3128,
- "service_fee_amount": 0.3
}, - "customer": {
- "name": "John Doe",
- "email": "john@doe.com",
- "ip": "123.456.78.90",
- "address": {
- "street_house": "1600 Pennsylvania Avenue Northwest",
- "city": "Washington",
- "state": "DC",
- "zip": "20500",
- "country_code": "US"
}
},
}POST applepay / sale
Metoda applepay/sale umożliwia przeprowadzenie pojedynczej transakcji z użyciem tokenu płatniczego Apple Pay.
Request Body schema: application/json
Query structure
required | object (Sale) A structure containing sale information. |
required | object (Customer) A structure containing customer data. |
required | object (ApplePayToken) A structure containing card information |
Responses
Request samples
- Payload
{- "sale": {
- "amount": "100.00",
- "currency": "EUR",
- "description": "TR001",
- "fraud_check_on": true,
- "avs_check_level": 2,
- "id_sub_merchant": 3128,
- "service_fee_amount": 0.3
}, - "customer": {
- "name": "John Doe",
- "email": "john@doe.com",
- "ip": "123.456.78.90",
- "address": {
- "street_house": "1600 Pennsylvania Avenue Northwest",
- "city": "Washington",
- "state": "DC",
- "zip": "20500",
- "country_code": "US"
}
}, - "card": {
- "token": "eyJwYXltZW50RGF0YSI6eyJ2ZXJzaW9uIjoiRUNfdjEiLCJkYXRhIjoicFpkZERNL2VmQm1qZ0drTk1RUmJncjM3VjdXVzhVMW40WlNXRjZzK2R4ZHBSMVRpbmI1aFlVVXRnQVBRRGZSV3NmR21ldEQ5RUF0cGFRTThPbEJGS21sdThKUXkrSUNhOXMyeDdSY3hFV1A4NXBsWWxNWjgvNkMwQWhLSGNEdkhuaW01VHZLVUZVY0NoeXhHNVlrNDhENUZObGl0OG0yL0dnWmkxVXkwS1RwTTZzZVMwMGpuRHl1a3hCenJmOGRVMFkrTzRSSWFPODhkNS9OSlA1ZVNnay8vVTlHb1lWUXBjZjQzL3BQbGt4ZUgrRGhwSVFuRHRza0ZhTFpNSkhaKzU3YUZUbVYvcXBPdHRmQ1dZRFp2MWF1aEUrRUJsbHltYmVCcUZUR21ySUt1NmFYNC83VEE0MXppalAyS1ZwaW5MOFUwaEg0Z2I2ZWZ4eVVOWHlPZVBJQXdzdUNqRkRKMmw2citySWhJZ05qdi9WQzdCYzBjelp4d29NKy9NRjRWNFJUb2gzUjZtU1ZiaGxTU1F2cWNwQnAvZDlFc3Z5aHFlVEVZT3YrUGF3PT0iLCJzaWduYXR1cmUiOiJNSUFHQ1NxR1NJYjNEUUVIQXFDQU1JQUNBUUV4RHpBTkJnbGdoa2dCWlFNRUFnRUZBRENBQmdrcWhraUc5dzBCQndFQUFLQ0FNSUlENGpDQ0E0aWdBd0lCQWdJSUpFUHlxQWFkOVhjd0NnWUlLb1pJemowRUF3SXdlakV1TUN3R0ExVUVBd3dsUVhCd2JHVWdRWEJ3YkdsallYUnBiMjRnU1c1MFpXZHlZWFJwYjI0Z1EwRWdMU0JITXpFbU1DUUdBMVVFQ3d3ZFFYQndiR1VnUTJWeWRHbG1hV05oZEdsdmJpQkJkWFJvYjNKcGRIa3hFekFSQmdOVkJBb01Da0Z3Y0d4bElFbHVZeTR4Q3pBSkJnTlZCQVlUQWxWVE1CNFhEVEUwTURreU5USXlNRFl4TVZvWERURTVNRGt5TkRJeU1EWXhNVm93WHpFbE1DTUdBMVVFQXd3Y1pXTmpMWE50Y0MxaWNtOXJaWEl0YzJsbmJsOVZRelF0VUZKUFJERVVNQklHQTFVRUN3d0xhVTlUSUZONWMzUmxiWE14RXpBUkJnTlZCQW9NQ2tGd2NHeGxJRWx1WXk0eEN6QUpCZ05WQkFZVEFsVlRNRmt3RXdZSEtvWkl6ajBDQVFZSUtvWkl6ajBEQVFjRFFnQUV3aFYzN2V2V3g3SWhqMmpkY0pDaElZM0hzTDF2TENnOWhHQ1YyVXIwcFVFYmcwSU8yQkh6UUg2RE14OGNWTVAzNnpJZzFyclYxTy8wa29tSlBud1BFNk9DQWhFd2dnSU5NRVVHQ0NzR0FRVUZCd0VCQkRrd056QTFCZ2dyQmdFRkJRY3dBWVlwYUhSMGNEb3ZMMjlqYzNBdVlYQndiR1V1WTI5dEwyOWpjM0F3TkMxaGNIQnNaV0ZwWTJFek1ERXdIUVlEVlIwT0JCWUVGSlJYMjIvVmRJR0dpWWwyTDM1WGhRZm5tMWdrTUF3R0ExVWRFd0VCL3dRQ01BQXdId1lEVlIwakJCZ3dGb0FVSS9KSnhFK1Q1TzhuNXNUMktHdy9vcnY5TGtzd2dnRWRCZ05WSFNBRWdnRVVNSUlCRURDQ0FRd0dDU3FHU0liM1kyUUZBVENCL2pDQnd3WUlLd1lCQlFVSEFnSXdnYllNZ2JOU1pXeHBZVzVqWlNCdmJpQjBhR2x6SUdObGNuUnBabWxqWVhSbElHSjVJR0Z1ZVNCd1lYSjBlU0JoYzNOMWJXVnpJR0ZqWTJWd2RHRnVZMlVnYjJZZ2RHaGxJSFJvWlc0Z1lYQndiR2xqWVdKc1pTQnpkR0Z1WkdGeVpDQjBaWEp0Y3lCaGJtUWdZMjl1WkdsMGFXOXVjeUJ2WmlCMWMyVXNJR05sY25ScFptbGpZWFJsSUhCdmJHbGplU0JoYm1RZ1kyVnlkR2xtYVdOaGRHbHZiaUJ3Y21GamRHbGpaU0J6ZEdGMFpXMWxiblJ6TGpBMkJnZ3JCZ0VGQlFjQ0FSWXFhSFIwY0RvdkwzZDNkeTVoY0hCc1pTNWpiMjB2WTJWeWRHbG1hV05oZEdWaGRYUm9iM0pwZEhrdk1EUUdBMVVkSHdRdE1Dc3dLYUFub0NXR0kyaDBkSEE2THk5amNtd3VZWEJ3YkdVdVkyOXRMMkZ3Y0d4bFlXbGpZVE11WTNKc01BNEdBMVVkRHdFQi93UUVBd0lIZ0RBUEJna3Foa2lHOTJOa0JoMEVBZ1VBTUFvR0NDcUdTTTQ5QkFNQ0EwZ0FNRVVDSUhLS253K1NveXE1bVhRcjFWNjJjMEJYS3BhSG9kWXU5VFdYRVBVV1BwYnBBaUVBa1RlY2ZXNitXNWwwcjBBRGZ6VENQcTJZdGJTMzl3MDFYSWF5cUJOeThiRXdnZ0x1TUlJQ2RhQURBZ0VDQWdoSmJTKy9PcGphbHpBS0JnZ3Foa2pPUFFRREFqQm5NUnN3R1FZRFZRUUREQkpCY0hCc1pTQlNiMjkwSUVOQklDMGdSek14SmpBa0JnTlZCQXNNSFVGd2NHeGxJRU5sY25ScFptbGpZWFJwYjI0Z1FYVjBhRzl5YVhSNU1STXdFUVlEVlFRS0RBcEJjSEJzWlNCSmJtTXVNUXN3Q1FZRFZRUUdFd0pWVXpBZUZ3MHhOREExTURZeU16UTJNekJhRncweU9UQTFNRFl5TXpRMk16QmFNSG94TGpBc0JnTlZCQU1NSlVGd2NHeGxJRUZ3Y0d4cFkyRjBhVzl1SUVsdWRHVm5jbUYwYVc5dUlFTkJJQzBnUnpNeEpqQWtCZ05WQkFzTUhVRndjR3hsSUVObGNuUnBabWxqWVhScGIyNGdRWFYwYUc5eWFYUjVNUk13RVFZRFZRUUtEQXBCY0hCc1pTQkpibU11TVFzd0NRWURWUVFHRXdKVlV6QlpNQk1HQnlxR1NNNDlBZ0VHQ0NxR1NNNDlBd0VIQTBJQUJQQVhFWVFaMTJTRjFScGVKWUVIZHVpQW91L2VlNjVONEkzOFM1UGhNMWJWWmxzMXJpTFFsM1lOSWs1N3VnajlkaGZPaU10MnUyWnd2c2pvS1lUL1ZFV2pnZmN3Z2ZRd1JnWUlLd1lCQlFVSEFRRUVPakE0TURZR0NDc0dBUVVGQnpBQmhpcG9kSFJ3T2k4dmIyTnpjQzVoY0hCc1pTNWpiMjB2YjJOemNEQTBMV0Z3Y0d4bGNtOXZkR05oWnpNd0hRWURWUjBPQkJZRUZDUHlTY1JQaytUdkorYkU5aWhzUDZLNy9TNUxNQThHQTFVZEV3RUIvd1FGTUFNQkFmOHdId1lEVlIwakJCZ3dGb0FVdTdEZW9WZ3ppSnFraXBuZXZyM3JyOXJMSktzd053WURWUjBmQkRBd0xqQXNvQ3FnS0lZbWFIUjBjRG92TDJOeWJDNWhjSEJzWlM1amIyMHZZWEJ3YkdWeWIyOTBZMkZuTXk1amNtd3dEZ1lEVlIwUEFRSC9CQVFEQWdFR01CQUdDaXFHU0liM1kyUUdBZzRFQWdVQU1Bb0dDQ3FHU000OUJBTUNBMmNBTUdRQ01EclBjb05SRnBteGh2czF3MWJLWXIvMEYrM1pEM1ZOb282KzhaeUJYa0szaWZpWTk1dFpuNWpWUVEyUG5lbkMvZ0l3TWkzVlJDR3dvd1YzYkYzek9EdVFaLzBYZkN3aGJaWlB4bkpwZ2hKdlZQaDZmUnVaeTVzSmlTRmhCcGtQQ1pJZEFBQXhnZ0dNTUlJQmlBSUJBVENCaGpCNk1TNHdMQVlEVlFRRERDVkJjSEJzWlNCQmNIQnNhV05oZEdsdmJpQkpiblJsWjNKaGRHbHZiaUJEUVNBdElFY3pNU1l3SkFZRFZRUUxEQjFCY0hCc1pTQkRaWEowYVdacFkyRjBhVzl1SUVGMWRHaHZjbWwwZVRFVE1CRUdBMVVFQ2d3S1FYQndiR1VnU1c1akxqRUxNQWtHQTFVRUJoTUNWVk1DQ0NSRDhxZ0duZlYzTUEwR0NXQ0dTQUZsQXdRQ0FRVUFvSUdWTUJnR0NTcUdTSWIzRFFFSkF6RUxCZ2txaGtpRzl3MEJCd0V3SEFZSktvWklodmNOQVFrRk1ROFhEVEU0TURjeE9URXpORGt6TVZvd0tnWUpLb1pJaHZjTkFRazBNUjB3R3pBTkJnbGdoa2dCWlFNRUFnRUZBS0VLQmdncWhrak9QUVFEQWpBdkJna3Foa2lHOXcwQkNRUXhJZ1FnR1ZOZlJESkZIclBYR0M0Z3MrTWJaZmtKZ2xXbkxKcDNoOTFkb2laTHVISXdDZ1lJS29aSXpqMEVBd0lFUnpCRkFpRUEvai9SV2hFZER4dEhSdlF3VlNTK1V5azNBbnE5ZmIwa09uMGl5d21jTGdFQ0lDNWN1Y0FRSXk1SHI5UzhqWHRWREJsU2lpeDBDYnVsRlppOGR6bUZ3RkZxQUFBQUFBQUEiLCJoZWFkZXIiOnsiZXBoZW1lcmFsUHVibGljS2V5IjoiTUZrd0V3WUhLb1pJemowQ0FRWUlLb1pJemowREFRY0RRZ0FFWmUrMlc5cTNyTEFETnNrNVdxc0VmR2cvQ01pdXNOWVpYdlJIeVZMWEowcFRSQ0VUR1dLQjl2dzNHZm9IZnA2RFFrK2FFTGxGeXFSRUswZC9MRDlWM1E9PSIsInB1YmxpY0tleUhhc2giOiJIYVZ4ZmdDUnVkOFpsRk1FWHZiTk1yNlk1MlhLQTNFaDljY0kveXR4eGxnPSIsInRyYW5zYWN0aW9uSWQiOiI4N2Q4MWIxNGQ1MzU4ZmFkZjE1ZjU1MWI5ZTM2MTg1Mzc4N2IyNjA2ZTM3MTY2Y2JkN2NhZjdmZWI5ZTczZDg3In19LCJwYXltZW50TWV0aG9kIjp7ImRpc3BsYXlOYW1lIjoiVmlzYSAxNDQ1IiwibmV0d29yayI6IlZpc2EiLCJ0eXBlIjoiZGViaXQifSwidHJhbnNhY3Rpb25JZGVudGlmaWVyIjoiODdEODFCMTRENTM1OEZBREYxNUY1NTFCOUUzNjE4NTM3ODdCMjYwNkUzNzE2NkNCRDdDQUY3RkVCOUU3M0Q4NyJ9"
}
}POST googlepay / sale
Metoda googlepay/sale umożliwia przeprowadzenie pojedynczej transakcji z użyciem tokenu płatniczego Google Pay.
Request Body schema: application/json
Query structure
required | object (Sale) A structure containing sale information. |
required | object (Customer) A structure containing customer data. |
required | object (GooglePayToken) A structure containing card information |
Responses
Request samples
- Payload
{- "sale": {
- "amount": "100.00",
- "currency": "EUR",
- "description": "TR001",
- "fraud_check_on": true,
- "avs_check_level": 2,
- "id_sub_merchant": 3128,
- "service_fee_amount": 0.3
}, - "customer": {
- "name": "John Doe",
- "email": "john@doe.com",
- "ip": "123.456.78.90",
- "address": {
- "street_house": "1600 Pennsylvania Avenue Northwest",
- "city": "Washington",
- "state": "DC",
- "zip": "20500",
- "country_code": "US"
}
}, - "card": {
- "token": "eyJzaWduYXR1cmUiOiJNRVlDSVFDcUE1T0Vpd1ptR29GNlVqUEI3MktBNWtOa2lyUE5WMGN0T1A4Uytwam1qd0loQUo1QjVXa3Vnd1JhNWk3enRUWjE4eHBEWjJXK0hNTjh3a0M2SFFCZ3ZyUWkiLCJwcm90b2NvbFZlcnNpb24iOiJFQ3YxIiwic2lnbmVkTWVzc2FnZSI6IntcImVuY3J5cHRlZE1lc3NhZ2VcIjpcIlJnSGV1UVA4OVFpa1FDZmtLemRia1g3dU4wUE8zSmFDcE5hRHRhQ1ZkQ0ErZFkvL0VyRzZvQ1NZZ3Yyc3dONkdaRmZwd09zL1ZiVTNjcVFLRC81YXRNQVV5STNidnZpOGRxcXlOb0J4aTVkUi9tbS9OZmRJdHpSdEE3YXovSndMTEpreGNOMzRLZHNQV3VhVHhRZ2MyWFBCUkN2TVpLeUQ1VWNuY1U4cktKSEhnSWlNZEMwUnhNU0Uxc1RVWEwxVDk0eURJck9jdlNlcmRYdnpLZGhUOUQxcUl0azA2VW5uc2dhRHFWdGg0SHMyY1hTUFVJYlNIc25ydlRsZGg2dGlkOTF2WWZRYldYeElqQUF1ZFRQME8xR25oTnJjYXo5WjBxeUVWUEVQQnVzc29kWU1pL1JQa3VNREh6TU1sUUV2Mms3SXBtdDZJZGVnd0t5L21VYlFNeld1NDdzc2Jmb2xWbW1vOGRrTlJhYmo5Z0dtQWwrL1ErelY1MUNPeG5CSWhBUHU2NUMwZ3RuTi8yZWJMNnZNdWQxbE5xRXV0WVd4alpGRWY4Q2ZkZ3lQM3M5WXdYWXdoenRTTi9ycGhCV1hpWmNOT29Ea2xxWWEvSVphT2o0TnVnNVdLU3hka2pVazhmSTJiNlV2ZEIwbHMrakpuenZRdStzUndlWHZoNmRRa2JuazhGS3VKeVdkZGl2c3NJcjlJZW1Jc3JFOUE5T3FlSnpWOVRjSThRb01ZWmNiQUZkcUlBRjhWTUJLSjMwU28yYyt4SnU5b21FUy9QbFVXU1hJdXltL1hXMldhd1xcdTAwM2RcXHUwMDNkXCIsXCJlcGhlbWVyYWxQdWJsaWNLZXlcIjpcIkJGZzZoNWZkQ0RIbWFNODlNN0VKOVdyWHVkZWh3bzFrci8rWmdNZDJiUE5NNmhHVVZRZVp2VHRZSm5ua1dGY2JVODZteXU0WmduM2VyL05pMUNwVFk1RVxcdTAwM2RcIixcInRhZ1wiOlwiY3NzcXNmcnJpSDRwSzlUQmJPRWpSMDc2Slc2YWNKL3JEQ3JHTUpaLzFaa1xcdTAwM2RcIn0ifQ"
}
}POST blik / sale
Metoda blik/sale to transparentna płatność kodem BLIK (BLIK level 0).
Request Body schema: application/json
Query structure
required | object (Sale) A structure containing sale information. |
required | object (Customer) A structure containing customer data. |
| code required | string <6 digits> Only digits are allowed. For test account CODE only ex. 123456 |
Responses
Request samples
- Payload
{- "sale": {
- "amount": "100.00",
- "currency": "EUR",
- "description": "TR001",
- "fraud_check_on": true,
- "avs_check_level": 2,
- "id_sub_merchant": 3128,
- "service_fee_amount": 0.3
}, - "customer": {
- "name": "John Doe",
- "email": "john@doe.com",
- "ip": "123.456.78.90",
- "address": {
- "street_house": "1600 Pennsylvania Avenue Northwest",
- "city": "Washington",
- "state": "DC",
- "zip": "20500",
- "country_code": "US"
}
}, - "code": 123456
}POST refunds
Metoda refunds umożliwia dokonanie zwrotu środków w odniesieniu do konkretnej transakcji (niezależnie od rodzaju metody płatności).
Request Body schema: application/json
Query structure
| id_sale required | integer <unsigned long> Identification number of the sale that should be refunded. |
| amount required | decimal <12,2> Amount to be refunded (always a positive value). Note that partial refunds are possible and can be issued up to the amount of the original transaction. |
| reason required | string <2-200 characters> A reason for the refund. Should be always entered, as the refund ratio should be kept on the reasonable low level. PeP risk management team will occasionally check the reason fields of the merchant when the refund ratio is too high. |
Responses
Request samples
- Payload
{- "id_sale": 1234567,
- "amount": 15,
- "reason": "Special discount."
}POST refunds / info
The refunds/info method returns data about the refund(s).
Request Body schema: application/json
Query structure
| id_sale required | integer <unsigned long> Identification number of the sale that should be refunded. |
Responses
Request samples
- Payload
{- "id_sale": 1234567
}POST sales / info
Metoda sales/info zwraca dane o transakcji, które pozwalają na określenie statusu płatności (włącznie z tym, czy środki były zwracane).
Request Body schema: application/json
Query structure
| id_sale required | integer <unsigned long> Identification number of a sale. |
Responses
Request samples
- Payload
{- "id_sale": 12345
}POST sales / status
Metoda sale/status umożliwia pobranie statusu pojedynczej transakcji w momencie, gdy nie jest znany jej numer ID. Jeśli numer ID jest znany, należy użyć metody sales/info.
Request Body schema: application/json
Query structure
| amount required | decimal <12,2> Amount of the performed sale. |
| currency required | string <3 characters> Currency code of the performed sale. ISO 4217 format, all uppercase. |
| description required | string <2-200 characters, UTF-8 encoded> Transaction Identifier will be sent to PeP's system. The field value needs to be unique for each transaction! We recommend that the value of this field is the transaction id in your system (store). It will later be visible in the Merchant Panel as a description of the transaction. Only alphanumeric characters are allowed. |
Responses
Request samples
- Payload
{- "amount": 45,
- "currency": "EUR",
- "description": "TR001"
}POST resales / sale
Metoda resales/sale umożliwia przeprowadzenie transakcji na podstawie wcześniej wykonanej płatności. Dzięki takiemu odniesieniu metoda nie wymaga podawania kompletnych danych (np. karty) i pozwala na szybsze dokonanie płatności.
Request Body schema: application/json
Query structure
| id_sale required | integer <unsigned long> Identification number of a sale. |
| amount required | decimal <12,2> The total amount of the sale. Use dot (.) as decimal separator. |
| currency required | string <3 characters> Transaction currency code. ISO 4217 format, all uppercase. |
| description required | string <2-200 characters, UTF-8 encoded> Transaction Identifier will be sent to PeP's system. The field value needs to be unique for each transaction! We recommend that the value of this field is the transaction id in your system (store). It will later be visible in the Merchant Panel as a description of the transaction. Only alphanumeric characters are allowed. |
Responses
Request samples
- Payload
{- "id_sale": 436635,
- "amount": 4.99,
- "currency": "EUR",
- "description": "TR001"
}POST 3DSecure / checkCard
Metoda 3DSecure/checkCard sprawdza, czy karta uczestniczy w programie 3-D Secure – to pierwszy krok podczas przeprowadzania płatności z użyciem tego zabezpieczenia.
Request Body schema: application/json
Query structure
required | object (Sale) A structure containing sale information. |
required | object (Customer) A structure containing customer data. |
required | object (Card) A structure containing card information |
| back_url required | string <2-200 characters, UTF-8 encoded> Website address where a customer will be redirected after performing the payment. |
Responses
Request samples
- Payload
{- "sale": {
- "amount": "100.00",
- "currency": "EUR",
- "description": "TR001",
- "fraud_check_on": true,
- "avs_check_level": 2,
- "id_sub_merchant": 3128,
- "service_fee_amount": 0.3
}, - "customer": {
- "name": "John Doe",
- "email": "john@doe.com",
- "ip": "123.456.78.90",
- "address": {
- "street_house": "1600 Pennsylvania Avenue Northwest",
- "city": "Washington",
- "state": "DC",
- "zip": "20500",
- "country_code": "US"
}
}, - "card": {
- "card_number": "4111111111111111",
- "expiration_month": "03",
- "expiration_year": "2017",
- "name_on_card": "John Doe",
- "card_code": "123"
},
}POST 3DSecure / checkCardByToken
Metoda 3DSecure/checkCardByToken sprawdza, czy karta uczestniczy w programie 3-D Secure – to pierwszy krok podczas przeprowadzania płatności z użyciem tego zabezpieczenia.
Request Body schema: application/json
Query structure
required | object (Sale) A structure containing sale information. |
required | object (Customer) A structure containing customer data. |
required | object (Token) A structure containing card information |
| back_url required | string <2-200 characters, UTF-8 encoded> Website address where a customer will be redirected after performing the payment. |
Responses
Request samples
- Payload
{- "sale": {
- "amount": "100.00",
- "currency": "EUR",
- "description": "TR001",
- "fraud_check_on": true,
- "avs_check_level": 2,
- "id_sub_merchant": 3128,
- "service_fee_amount": 0.3
}, - "customer": {
- "name": "John Doe",
- "email": "john@doe.com",
- "ip": "123.456.78.90",
- "address": {
- "street_house": "1600 Pennsylvania Avenue Northwest",
- "city": "Washington",
- "state": "DC",
- "zip": "20500",
- "country_code": "US"
}
}, - "card": {
- "token": "12a34b45c67d89e00f1aa2bb3cc4dd5ee6ff12a34b45c67d89e00f1aa2bb3cc4"
},
}POST 3DSecure / authSale
Metoda 3DSecure/authSale umożliwia przeprowadzenie płatności kartą na podstawie wcześniej przeprowadzonej autoryzacji 3-D Secure.
Request Body schema: application/json
Query structure
| id_3dsecure_auth required | integer <unsigned long> Identification number of initiated 3-D Secure authentication. |
Responses
Request samples
- Payload
{- "id_3dsecure_auth": 237473
}POST 3DSecure / auth
Metoda 3DSecure/auth umożliwia przeprowadzenie autoryzacji karty na podstawie wcześniej przeprowadzonej autoryzacji 3-D Secure.
Request Body schema: application/json
Query structure
| id_3dsecure_auth required | integer <unsigned long> Identification number of initiated 3-D Secure authentication. |
Responses
Request samples
- Payload
{- "id_3dsecure_auth": 237473
}POST ideal / sale
Metoda ideal/sale wykonuje transakcję iDEAL.
Request Body schema: application/json
Query structure
required | object (Sale) A structure containing sale information. |
required | object (Customer) A structure containing customer data. |
| back_url required | string <2-200 characters, UTF-8 encoded> Website address where a customer will be redirected after performing the payment. |
| bank_code required | string <8-11 characters> Bank BIC code. |
Responses
Request samples
- Payload
{- "sale": {
- "amount": "100.00",
- "currency": "EUR",
- "description": "TR001",
- "fraud_check_on": true,
- "avs_check_level": 2,
- "id_sub_merchant": 3128,
- "service_fee_amount": 0.3
}, - "customer": {
- "name": "John Doe",
- "email": "john@doe.com",
- "ip": "123.456.78.90",
- "address": {
- "street_house": "1600 Pennsylvania Avenue Northwest",
- "city": "Washington",
- "state": "DC",
- "zip": "20500",
- "country_code": "US"
}
}, - "bank_code": "INGBNL2A"
}POST addAccountSubmerchant
The api_beta / addAccountSubmerchant method allows reporting a new merchant via API.
Request Body schema: application/json
Query structure
required | object (Company) A structure containing company data. |
required | Array of objects (Persons) |
required | object (BankAccount) A structure containing bank account data. |
Responses
Request samples
- Payload
{- "company": {
- "name": "John Doe Company",
- "business_type": "registered-partnership",
- "company_number": "01033457801230",
- "krs": "0012333391",
- "vat_id": "5221233782",
- "phone": "544323233",
- "email": "jan@kowalski.pl",
- "address": {
- "street_house": "1600 Pennsylvania Avenue Northwest",
- "city": "Washington",
- "state": "DC",
- "zip": "20500",
- "country_code": "US"
}
}, - "persons": [
- {
- "first_name": "John",
- "last_name": "Doe",
- "citizenship": "PL",
- "pesel": "82010123223",
- "date_of_birth": "1982-01-01",
- "is_representative": "Y",
- "is_ubo": "Y",
- "identity_doc_number": "XYZ123211",
- "identity_doc_expiration_date": "2028-12-12"
}
], - "bank_account": {
- "iban": "PL40864910155342868951311268",
- "bic": "SADSAEXZ",
- "currency": "PLN"
}
}POST addSubmerchantDocument
The api_beta / addSubmerchantDocument method enables adding documents related to a given submerchant via API.
Request Body schema: application/json
Query structure
| id_submerchant required | integer <unsigned long> Identification number of the submerchant. |
required | object (Document) A structure containing document data. |
Responses
Request samples
- Payload
{- "id_submerchant": 1,
- "document": {
- "file_name": "document.pdf",
- "file_content": "<base64>",
- "doc_type": "bank_account_proof"
}
}POST cards / token / getData
The cards/token/getData method allows you to retrieve information about the token.
Request Body schema: application/json
Query structure
| token required | string Token identifier passed after a successful card tokenization. |
Responses
Request samples
- Payload
{- "token": "string"
}POST cards / token / sale
The cards/token/sale method allows you to make a single payment using a tokenized card.
Request Body schema: application/json
Query structure
| token required | string Token identifier passed after a successful card tokenization. |
| amount required | decimal (12,2) Transaction amount (dot as separator) |
| currency required | string (3) Transaction currency in ISO 4217 format |
| description required | string (1-255) Transaction Identifier will be sent to PeP's system. The field value needs to be unique for each transaction! We recommend that the value of this field is the transaction id in your system (store). It will later be visible in the Merchant Panel as a description of the transaction. Only alphanumeric characters are allowed. |
Responses
Request samples
- Payload
{- "token": "string",
- "amount": null,
- "currency": null,
- "description": null
}POST cards / token / revoke
The cards/token/revoke method is used to revoke a specific token.
Request Body schema: application/json
Query structure
| token required | string Token identifier passed after a successful card tokenization. |
Responses
Request samples
- Payload
{- "token": "string"
}